Saturday, December 31, 2011

Out with the old and in with the new

stash down 2012!

I am quite happy to see 2011 in the rearview mirror.  It wasn't the worst possible year but it was a pretty difficult one for us, at least the first half with the whole unemployment/no money thing.  Here's to hoping 2012 brings much better things for us (steady employment would be huge)!  At least it was a very productive year for my crafting habit.

First, a recap of my goals for 2011, I have had them posted in my sidebar all year and have been checking items off as I did them.  So what did I manage to accomplish this past year?  Well, I did knit at least 6 pairs of socks in the year, as a matter of fact I finished 8 pairs and have had a ninth pair languishing on the needles for the past 2 months (it's a pair for Destucto boy and for some reason I just do not want to work on them).  Going along with the sock theme I also learned to do 2 at a time knitting, in fact it is my preferred method of knitting now, less counting!  I did a pair of toe up socks but prefer top down to ensure proper fit for my incredibly high arches.

I have been swatching for everything, although sometimes that still doesn't work out that well, frogging is my friend!  I did manage to knit at least one pattern from each of the books I owned at the beginning of the year, I have now added 2 more books to my collection and have a stack on magazines also that I need to knit something from.  I definitely worked on holiday knitting all year, starting in January and still finishing up today.

I kind of failed on the whole keeping current with scrapbooks, updating the blog every week, and losing some weight.  You win some, you lose some!

For the coming year I think I want to accomplish the following: make a quilt for Lil' Miss, make a quilt for my bed, make at least one holiday themed wall quilt (I want to make one for each month of the year to switch out on our family room wall), finish up the 2011 scrapbook, finish up Destructo boy's birthday book from 2011, learn to steek (yikes!), make sweaters with my sweater quantities of yarn before purchasing more (4 right now), and make socks/shawls/anything to use it up with all my sock yarns before buying more since the box won't close (11 colorways right now!).

So, do you have any goals for the new year?  Whether you do or not I hope the new year finds you happy and healthy and 2012 brings lots of love and happiness to us all!

Sunday, December 18, 2011

Still knitting along!


Yup, I am still keeping up with the advent calendar scarf knit-a-long!  I know, I'm shocked too.  It's a little unclear to me whethe r the patterns are getting easier or if I am just knitting faster as I am getting each day's pattern done on that day.  And doing so even with wrapping presents, last minute shopping trips, and finishing up handmade presents!


Here it is up to day 18, I meant to take a picture every 7 days but I started on the pattern for the 18th before I remembered, oh well, an extra day doesn't hurt!  I am kind of glad I decided to do this in laceweight yarn as this sucker is already pretty long and I still have 6 more days to knit, I probably could have gone down a needle size too. 

As much as I love participating in this KAL I can't help but think about life after it.  I think it will be nice to not have to worry about falling behind if I miss a single day, but it will also be sad to not have something to look forward to every day along with the camraderie of all the knitters working on this around the globe (694 projects, 26 nations and all 50 US states represented).  It will be nice to finally get started on my Dark & Stormy cardigan though!

Wednesday, December 14, 2011

Advent Craziness

Somehow in my fevered brain I had the brilliant idea to participate in the Advent Calendar Scarf 2011 KAL, what in God's name was I thinking?!  I have been able to keep up thus far, but I fear I will soon fall behind, especially once I start on the cookie baking craziness, {WARNING: extended tangent ahead!}  for some reason I always end up making 10 different kinds of cookies, am totally stressed and wiped out then have tons leftover, when will I learn!  Although I did finally learn about the glitter wrapping paper that tape won't stick to, oh the frustration of self-unwrapping presents, didn't get any of that this year since Target has this awesome kraft paper wrapping paper this year.  I have been wanting to use kraft paper for years and they finally have some for sale, yeah!

progress up to the third day's clue

Anyway, back to the knitting, the pattern is a lace sampler and is a complete surprise as every day we get a clue for that days pattern, like a child's advent calendar.  It usually takes me about 5 to 6 hours to get through the days pattern which I have been able to keep up with so far, I just fear I will fall behind as we get closer to the big day.  It is fun though, I have already encountered a number of stitches I had not done before, and it is interesting to see how each pattern looks with all the others.

I think the idea is to have a scarf complete to wear on Christmas day, but since I already have a red dress to wear I think the scarf might be too much.  I actually have two red dresses, but I got hit bad by buyers remorse and bought the second one as I thought I'd get more use out of it than the first, which I still need to return back to the store, ugh.  Somehow I don't think even laceweight yarn can dry that fast though it would be nice to try.

and progress up to day 10!

Monday, December 12, 2011

Morgan, how I hate thee, let me count the ways!


Which is exactly why I hate this pattern, having to count every stitch on every row.  I do however, love the results.  At the end you have a fantastic driving cap made all in one piece with just a little seaming at the end, ingenious construction truly.  I just wish there wasn't quite so much counting needed for the end result.

Lil' Miss modelling the hat for me, I fear it may be too small for Chef 

I just finished making a second one of these hats for my dear friend The Chef as a Chanukah present.  The one I made last year out of a wool/acrylic blend was so well received I decided to make a second out of a cotton/linen blend for summertime wear for him.  I'm sure he will love this one too and it will undoubtedly look great on him, but, all things considered I think it will be a few years before I even consider making another, I just hate the counting that much.

Then I tried it on and looked in the mirror...dang it looks cute!  I may suck it up and make one for myself since I am sure something in my stash would work.  But all that counting, as cute as it is I'm not sure I am ready to go through that again anytime soon.

Friday, December 9, 2011

Digger is complete!

Sorry for the prolonged silence!  Somehow time just got away with me, I have been knitting but since many of the projects are intended as gifts, well, I just can't discuss them here.  I can tell you all about the latest project for Destructo though, I am quite proud of it.


This jacket took a really long time considering the size but I kept stopping as it made me nervous.  You know how it is, the knitting project is scary so set it aside for awhile as you work on something you have far more confidence in yourself  at making and then get back to it on a particularly good day self-confidence wise (is that even a proper word?).  There were a couple of new techniques in this project for me, of course the intarsia but also sewing in a zipper, yikes!


Destructo-boy seems to love it and I am pretty happy with it myself so it was well worth all the trouble.  For the zipper I first tried to hand sew it in but was not keeping even tension on the knit fabric so it was bunching up kind of funny.  Since I just wasn't happy with that I ripped out the seam and re-pinned the whole zipper so I could make an attempt with my machine.


Ah, the magic of a walking foot!  I went really slowly and carefully as I sewed with the machine and it did a much better job than I did by hand.  All I had to do was whip stitch the floppy edge of the zipper tape down and fold down the upper cut off edged of the zipper tape.  I think it came out beautifully if I do say so myself!  It was just a little strange to sew on a zipper without the zipper foot on the machine.


Another obstacle were all the ends to weave in, even with doing a Russian join at each color change on the striping part of the jacket there were still floppy ends that needed to be woven it.  Well, I suppose I could have just trimmed them but I thought they would look better woven in farther away from the edge of the jacket.

I must say I think it is awesome of the company to provide the pattern at no charge upon request, you don't often find companies willing to do such a thing.

Monday, November 7, 2011

Digger progressing, slowly


I am loving this jacket, it just seems to be taking awhile to finish up.  I suppose the fact that I am into endless stripes up the shoulders and into the hood doesn't help with the boredom!  Destructo-Boy certainly loves it, every time he sees it while I am knitting it he pets it and asks if it is for him, too cute!

I won't lie, the intarsia was very intimidating but once I got started on it I could begin to see the sense in it.  I still feel a little rough on what to do when switching colors, like how much tension to use.  However, since it hasn't fallen apart I will assume I did it correctly if not perfectly.  For the lettering I used the stranded technique rather than intarsia and it seemed to come out pretty good, no puckering on that part.  I kind of mixed the two techniques on the construction vehicles and that may be part of the issue with the puckering.  Not sure, but I will definitely do this technique again and maybe not mix them up to see if it looks better that way.


Another new technique for me on this project will be the zipper, I have never installed one on a knitted project before.  There is some sort of fancy way of doing it I have read notes about that involves putting holes in the zipper prior to knitting it into the garment.  I'll figure it out when I get there I suppose!

Saturday, October 29, 2011

A different kind of Christmas village

I have been debating starting one of those ceramic house village collections for quite awhile now.  The ones by Lemax at the local Michaels always seemed kind of, well, a little cheesy to me and roughly made.  However they are affordable which can't really be easily said about what I was really considering, Dept. 56 houses.  There was even a store of theirs locally where we could go and look at all the different villages they carried.  I think we ended up in there every Christmastime looking and wishing we could afford to start a village.

Now that Mister Vonkysmeed's employment status is more stable I decided to definitely start a collection this year and had even researched a local store that carries Dept. 56 villages for me to go look again.  Then I ended up on the LEGO website to request a free magazine subscription for Lil' Miss and one thing led to another until I discovered this,

LEGO Winter Village Bakery, 10216

Yup, LEGO has gotten into the Christmas village business and they have a new customer in me!  This is the third year they have produced a new building and with Mister Vonkysmeed's blessing I have ordered all three buildings to get us started.

With these buildings we get the additional fun of assembling them together as a family, always a good thing in my book!  Additionally they are not made out of fragile porcelain as the other villages are, always a bonus in this family with young kids and a 'bull in a china shop' kind of hubby!

Sunday, October 23, 2011

Starting on my second quilt

fiesta de los muertos by Alexander Henry Fabrics

Since I have special ordered the fabrics off the internet I suppose I really do need to get this gift done for Mister Vonkysmeed for Christmas!  He has always been a huge fan of Oingo Boingo and has had a box full of old concert t-shirts sitting in the garage for years.  I thought it was a shame for them to be sitting in the box and suggested using them in some sort of project instead.  He agreed to this idea and I discovered a wealth of information online about t-shirt quilts.  To make sure I actually got this done I promised him a Christmas gift, and now that I have the fancy interfacing on hand and have ordered fabric I really need to get started on it!

The fabric is really amazing, part of the folklorico collection by Alexander Henry fabrics, they will definitely work with the assortment of shirts I have, 99% of which are black and at least half say Dia de Los Muertos on them.  The confetti fabric  seems almost custom made to go with Oingo Boingo!  I'll be using it for the sashing and binding around the shirts themselves, the fiesta de los muertos fabric will be used for the back.  I think I'll be using my new quilting book, The Practical Guide to Patchwork by Elizabeth Hartman to figure out how to piece the back together.  I think I may go get a few pieces of solid fabrics to work with the patterned fabrics on the back, maybe even for the binding too, I'll have to get started piecing and see what speaks to me.

The interfacing I have is amazing!  Unfortunately I have no idea what it's called or where to get it, my friend The Quilt Master bought it through a friend of hers for me.  It is essentially a very thin cotton with the fusible stuff on one side of it.  What this means is after I fuse it to the shirts they will continue to be soft and flexible instead of stiff like regular interfacing but still stable enough to cut out properly.

Now wish me luck as I go off to start cutting and fusing!

Thursday, October 13, 2011

Poor Me...

Feeling down and sorry for myself, that would be me lately.  Why?  No reason in particular it has just been hard to want to do much of anything.  Oh, I am still knitting but I just feel tired and yucky all the time, thus why I have been neglecting my blog here.  Hopefully I'll get back to normal soon.  At least the house is fairly clean though!  If I let that go I get anxious on top of everything else so I do keep that up.  Sorry to complain but if not here than where?

I have been working on the knitting slowly but have totally neglected the scrapbooking, which makes me feel guilty and so I neglect it even more.  Notice a vicious cycle there anyone?!  I like to have big blocks of time when I scrapbook and I just haven't been able to set any aside to devote just to that so to the backburner it goes.  Knitting is much easier to pick up and knit for a few minutes before having to do something else so I almost always makes a little progress daily on one project or another.

I'll be back next week, hopefully with more energy and some fun knitting to share!


Wednesday, September 28, 2011

Of mysteries and frustration

I have two big projects on the needles right now, and funnily enough they are both on US 7 needles (really glad I ordered those nickle plated ones now!).  One is a mystery KAL by Susanna IC as a thank you for her support group on Ravelry reaching 1,000 members.  The other project is from Custom Knits by Wendy Bernard, the Backwards Cabled Pullover that I am making the backwards version of.


My mystery project is just that, a total mystery except that I know it will be a crescent shaped shawl designed by Susanna IC that uses beads.  I ordered some Valley Yarns Charlemont in dusk for this project and am enjoying the yarn thus far.  You can really feel the silk content in the yarn, it has that same dry crispness that silk fabric on the bolt has.  The yarn is a tad splitty, but not enough to keep me from ever using it again, the limited colors available will do that (only jewel like tones available and I prefer brighter colors).  The beads are from ArtBeads.com, TOHO 6/0 silver lined gray, and look amazing with the yarn to my eye.  I wanted a more subtle effect than the silver lined clear beads I also ordered were giving me, just too much bling for me.  The first clue of six came out last Saturday and I was done with it by Sunday.  Unfortunately for me the clues will be released about every 10 days or so meaning I'll probably do a lot of knitting on it and then it'll sit for a week until the next clue is released.  Of course, that leaves me plenty of time to fight with the other project...


That other project isn't too difficult if one actually takes the time to carefully read the pattern which I failed to do.  I misunderstood part of it, 'Repeat Increase Row 1 every other row", I read that as being every other right side row but she literally meant every other row.  Due to this mistake I had to restart after getting the raglan shaping finished, and then had to restart it again after I missed a raglan increase and it would have driven me crazy to leave it as is (yes, I am that much of a perfectionist, I would have seen it every time I put it on and it would have bugged!).  Being on the third try now it is going fairly smoothly, I hope to have no more issues with it.  I am finally getting a chance to use up some Knit Picks Swish dk in beach glass that has been in stash for quite awhile now.  I always knew it would be used for a sweater of some kind but had no idea which one, after looking through this book trying to decide what to make I think it will look great with this one!  Hopefully I'll have enough yarn to make the sleeves longer, full length or 3/4 length.

Tuesday, September 6, 2011

8 Years Ago Today...


This day

I will marry my friend,

the one I laugh with, live for,

dream with, love

Monday, September 5, 2011

How to: Make a crochet hook case


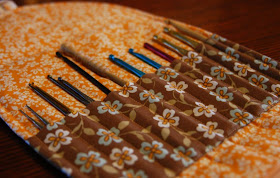
Not that there aren't some really great patterns/tutorials already available all over the net but yet again I just couldn't find quite what I was looking for.  The free tutorial available at the Moda Bake Shop blog came really close but the instructions seemed overly complicated to me and I just really didn't want to do all that.  So, taking my favorite part of that pattern, the curved flap, I reworked my interchangeable knitting needle case to fit crochet hooks.  A quick disclaimer in the size, this case was designed for long handled crochet hooks as I have a lone Brittany birch wood hook that is 8" long, so I made my case to accommodate it, if you just have the Susan Bates or Boyle hooks you can either cut out the case pieces 1 1/2" shorter and/or make adjustments to the pattern as noted in the portion of the pattern about top stitching for the folds.  So in celebration of September being National Sewing Month, let's get sewing!

the 2 cases I got out of the fat quarter pack from JoAnn's
 
First gather up your materials:
compass & cardstock template
  • Two 20 1/2" x 9 1/2" pieces of fabric for outside of case and for lining (to make the curved top I used a compass and made a half circle on a piece of cardstock to use as a cutting template for all my pieces)
  • 9 1/2" x 8 1/2" piece of fabric for hooks pocket
  • 2" x 4" piece of fabric for button loop, or make a button hole on the curved top flap
  • Two 5 1/2" x  7 1/2" pieces of fabric for zippered pocket
  • 20 1/2" x 9 1/2" piece of interfacing (whichever weight you prefer, I used heavyweight as that was what I had on hand)
  • 20 1/2" x 9 1/2" piece of batting
  • 7" zipper
  • button


    First you will need to prepare the fabric that will make the pockets your crochet hooks will be slipping into later.  Fold the pocket piece of fabric in half lengthwise, making it 9 1/2" x 4 1/4", then sew with a 1/4" seam allowance along the edge.  After sewing snip off excess fabric, fold the tube right side out and press.

    Next we'll work on the pocket in the lining.  Yet again, I used the wonderful instructions from the U-handbag blog by Lisa to install the zipper and pocket.  If you like to sew you should definitely follow her blog, great stuff there!  Anyway, I put my zipper opening centered at 5 1/2" from the bottom of the lining fabric and didn't use any interfacing for my pocket, other than that I pretty much followed her instructions exactly.  I did need to trim both ends of my zipper before sewing on the second piece of pocket fabric to close it up.

    l: before sewing; r:after zipper sewn in, before pocket lining sewn together

    Then you'll want to make a fabric sandwich by layering together the interfacing, batting and lining fabric.  On top of this sandwich pin the crochet hook pocket fabric 2" above the zipper (this is where the bottom of the hooks will be) and sew along the bottom edge of the pocket fabric.  I like to position the pocket fabric so the top edge of the pocket fabric is the creased fold you pressed earlier, as I think it makes for a cleaner looking opening to the pockets this way.  Then top stitch parallel to this seam 1/4" down from the pocket edge, this will make it easier to fold the case later. 


    placement of hook pocket above zipper

    Next, mark where the seams dividing the crochet hook pockets are going to be located with a cloth marking pen.  I made these marks top and bottom to ensure straight lines would be sewn.  Sew from the bottom to the top of the crochet hook pocket along these marks.  Make sure to leave enough thread on all these seams to pull both ends through to the interfacing side to knot together and cut off the excess.  I started in the middle at 5" in from the left edge and then sewed lines parallel to that one in 3/4" increments to make the hook pockets stopping at 1 1/2" from either edge.

    sewing parallel lines for hook pockets

    measurements for hook pockets

    Next we'll do the top stitching for the upper fold at 8" from the bottom of the hook pocket and again at 1/4" above that (if you need to make the case a little smaller for shorter hooks instead of cutting the fabric out smaller you can just do the top stitching at 6 1/2" from the bottom of the hook pocket and again 1/4" above that).

    placement of top stitching for upper fold

    Now to make the button loop out of the 2"x4" fabric, fold it in half lengthwise (1"x4") and press, then fold the outer edges into the crease and press it flat again.  Fold along the first crease and iron flat once more.  Sew the open edge closed, with approximately 1/8" seam allowance.  Pin the loop to the top center of the lining fabric sandwich, at the end where the curve is, with the raw fabric edges all lined up together and the loop to the inside of the lining.

    l: button loop folded & pressed; r: pinned to top curve

    Layer the outer fabric on top of everything with right sides together, pin around the edges.  Sew it all together 1/4" in from the edge leaving a 4" opening at the bottom to pull the case right side out.  I sewed in a curve around the bottom corners to better match the deep curve on the top flap.  Trim excess fabric all around,  turn right side out, and press all seams. Hand stitch the opening at the bottom of the case closed.  For added stability I sewed a top stitch all around the outside edge of the case 3/8" in from the edge.  Pull all loose threads through to the lining side, tie off and snip excess.

    all pinned and ready to sew shut

    hole that needs hand stitching to close

    If you chose the button loop option fold the case into thirds to position the button so the loop will go around it and hand sew the button on through only the outer fabric.  If you decided to do a buttonhole put it where you like on the upper curved flap and then hand sew on your button to the bottom flap for either option.  Ta-da!  All done.  Now go crochet something!

    finished cases, yea!

    Please let me know if you were able to understand my instructions, or if you have had any problems with them.  I sometimes over think things so may have not made something as clear as I could have.  Happy sewing!

    Saturday, September 3, 2011

    Needle Love


    I'll admit it, I've been a wooden needle snob, I turned up my nose at needles made out of any other material.  I used to prefer wood or bamboo to anything else but after discovering the harmony interchangeable needles from Knit Picks I hardly ever touched my collection of straight needles.  Then a few weeks ago I got my first nickle plated interchangeables with my Knit Picks order.  I must say that I am hooked!

    They are fantastic with stickier yarns, so much easier to knit the Lion Brand fisherman's wool I was working with than my wood needles.  Don't get me wrong, I still love my wood needles, but after fight5ing with the wool yarn it was a real relief to have it just slide pleasantly along my needles. They probably won't be all that great with slippery silk or cotton yarns but for those stickier yarns like wool or acrylic they are perfect.

    I have also found they don't hurt my hands as the metal straights I have used will, I have always felt that wood just warms nicer to my hands and the flexibility is more comfortable but I must say the nickle plated needles are just as great to use as wood.  I have had problems in the past with fatigue from using metal crochet hooks, but I can say I definitely did not have that problem with these nickle needles.  They are nice and light and don't make that annoying clicking that drives me crazy with the aluminum straights, I don't like to hear my knitting, I much prefer to feel it.

    I guess I'll have to make myself a new interchangeable knitting case to make room for a whole new set of needles.  One row for harmonies and one row for nickle plated!  Because of course now that I have tried them I must have a full set of both. I foresee lots of little orders from Knit Picks to fill out my collection!

    Friday, August 26, 2011

    Scrapbook Progress


    Yea!  I finally have made some progress since I have actually felt like working on them again.  The book for 2010 is completely finished and I am in progress on the winter/spring portion of 2011 and scrapping Lil' Misses birthday book (each kidlet has a book of just their birthday's, thanks Gramma for that great idea!).  I am rather proud of myself that I am making progress since I haven't even received the supplies to scrapbook the in progress pages, but that certainly doesn't stop me from designing the layout and printing the pictures!  Now I just need to keep the momentum going and keep caught up with them!

    Friday, August 19, 2011

    Late Summer Knitting


    It has been a pretty cool summer so far making it not terribly difficult to knit this year.  I've been working on a few projects I can't talk about (Christmas gifts are kind of hush-hush you know) but I am working on two things right now that I can talk about.


    First up is the Plein Air Tote out of Interweave Knits Fall 2010.  It is a really nice looking pattern and I am using up some basic Fisherman's Wool yarn that I was give for my birthday on this project.  I have changed up a few things, like using smaller needles since I am using worsted rather than aran weight yarn and mixing two colors for the moss sides.  It has been pretty easy to follow so far, I already have both cabled sides and the moss stitch panels all done.  This is one project I fear may end up hibernating for awhile though, since the pattern calls for a sewn lining and I'll need to find some leather handles for it.  Since I am not a fan of thrift shops I am not really sure what I am going to do to find inexpensive handles, maybe I should enlist some of my more thrift store-friendly buddies for help.


    My second work in progress is Lil' Misses cardigan for back to school in a few weeks.  She chose the Olearia pattern by Georgie Hallam which I must say is fantastic.  It was definitely a little confusing at first since there are several variations to the cardigan included in the one pattern, so I would suggest to anyone else using the pattern to read through it first as I found I needed to.  The cardigan is being knit with some lovely Knit Picks Comfy sport weight yarn is the bison colorway, I know, it's not exactly the first color that comes to mind when you think of a 6 year old girl.  However, since we have already bought some new clothes for fall and the one thing they seem to have in common is brown, I though this color made the most sense for a cardigan (I feel like I am knitting with chocolate when I work with it which is a special bonus!).  Plus everyone, even a 6 year old, needs some nice neutral colors in their closet!

    Wednesday, August 17, 2011

    Destructo Boy's new quilt

    Yes, already finished!  I know, not much of a shock considering what an easy pattern it was but I am still rather pleased with myself.  I am so glad I got my new walking foot for the sewing machine, it worked amazingly well and this would have been impossible to do without it.  I suspect doing the hand stitching for the binding probably took the most time, my thumb is certainly still sore from it!


    In case anyone is wondering, the majority of the cute car patterned fabric was made by Hoffman Fabrics, the blue sashing is a generic quilters cotton I picked up from Joann's and the aloha print fabric on the back of the quilt is by a company that I think is out of Hawaii that my local fabric shop carries, unfortunately the name escapes me right now.  I used some polyester batting from Joann's also since I had already washed the fabric and really didn't feel like washing the batting too.  Next time I'll use cotton batting and just wash it all together to get that nice scrunchy look.


    I am actually really excited to keep working on quilts, Lil' Miss has already asked when she is getting one.  She may have awhile to wait as I really need to make one out of Mister Vonkysmeed's concert shirts first and I have been wanting one for my bed for quite awhile now.  Then of course I was inspired by The QuiltMaster to make holiday themed wall hanging quilts too, I already have the perfect spot in mind behind the couch.  Great, just what I needed, another addictive hobby!

    Friday, August 12, 2011

    A Place to Knit


    This is my new knitting spot and boy is it comfy!  We finally ordered a couple of Sky Chairs after wanting them for years.  There has only been a place to hang them for about 2 years, so I am not that upset we didn't get them sooner, but I sure am glad to have them now!  I have sat in their samples at their booth every time I have gone to a Renaissance Fair for the past 20 or so years and have always wanted one.  Now I have two!  It makes a great spot to relax and knit while the kids are playing in the backyard, and the fact I can turn around in it easily to keep them in view is an extra bonus, makes me much more comfortable with them in the pool.  About my only complaint is the fact I have to kick a child out of my seat whenever I leave it for an instant.

    Friday, August 5, 2011

    Quilt in progress

    I cannot believe how fast this thing went together!  Okay, I realize now this was a ridiculously easy pattern, but at least now I understand how quilts go together.  I still need to get the backing fabric, I already have the batting and just received a brand new walking foot in the mail so I can quilt it all together myself.  Now to figure out exactly how I want to quilt this thing, shadow quilting the seams, or just big X's across each square?


    Yes, I am already thinking about the next one, which will be a t-shirt quilt of all Mister Vonkysmeed's beloved Oingo Boingo concert shirts.  I should have that done in plenty of time for Christmas and now is a great time to start being on the look out for Day of the Dead fabric for the backing.  So I guess the Big Block quilt pattern was a pretty good introduction to what I will need to do to get that project done!

    Tuesday, August 2, 2011

    I think my needles are smoking

    Because this cardigan knit up crazy fast!  It took me 13 days from start to finish to make it, usually it takes me at least a month to make a sweater and far more than that when I make mistakes (like my Nantucket Red that took almost a month and a half).


    The pattern is Lilas by Hilary Smith Callis, and is a very easy to follow top down raglan sleeve construction.  It seemed kind of odd at first since you are knitting that huge collar first, but as I went along it made more sense to me.  There is very little shaping to this cardigan as it is meant to be more of a casual summer layering piece.  All of this made it great for tv viewing, I just placed stitich markers between the stockinette body of the sweater and the border stitches so I could happily knit while engrossed in catching up with my DVR (mostly Falling Skies which shows a lot of promise to be a great show, here's hoping they keep making it better).  As for changes, I just made the body of the cardigan about 2.5" longer than indicated, yes the pattern is for a cropped sweater but since I am a bit squashed through the body a longer length looks better on me.  I also briefly contemplated making the sleeves 3/4 length but then realized part of the reason I loved the sweater was the great picture of Hilary wearing it over a long sleeve shirt so I followed the pattern exactly in the end (I need to go shopping for long sleeve tees once the stores get their fall collections in, I could wear all my short sleeve cardis this way!). 


    For the yarn I picked out Comfy worsted by Knit Picks in the sea foam colorway that was purchased for me as a birthday gift from Chatty-Cathy and Grumpy.  I lurve this yarn!  It's a blend of cotton with acrylic which gives it a bit of stretchiness making it very easy and comfortable to knit with, unlike most cottons.  One of the reviews of this yarn on Ravelry describes it as feeling like your favorite tee shirt that's been washed a million times into comfy softness and that is exactly how it feels!  I will definitely be using this yarn again.


    I am looking forward to wearing this sweater again soon, well at least when it starts to cool down again!  I really like the casual look to the floppy collar when the cardigan is left hanging open and that it can be pulled together for added warmth but still looks great.  Another great addition to my growing collection of hand knit cardigans.

    Monday, July 25, 2011

    Enchanted Tiki Room socks


    My final pair of socks to accomplish my goal of 6pairs of socks knit in 2011!  These were in a KAL for the Sock Knitters Anonymous group on Ravelry for June, the challenge that month was to knit self striping sock yarn in a pattern that would show off the stripy effect.  For my self striping yarn I chose to use some Felici fingering in the tiki colorway (and I even bought extra to make sure Lil' Miss could have some socks in this great color too), and yes, when I first saw the name I had the theme song to the Enchanted Tiki Room at Disneyland running through my head.  I have already promised myself to get a cool picture of my socks at the attraction at some point soon!

    I really wanted to do the Jaywalkers pattern, but the way the chevron pattern is created would be too tight over my high arches based on other knitters comments.  I suppose I could have tried to make them, but then when they didn't fit after all that work and me loving the look of the pattern so much I probably would have cried.  So I kept looking until I found Topographical socks by Katie McEwen which gives the chevron look, but has columns of purl stitches and lacy yarn overs that give the sock a bit more stretch.  That said, they are still rather snug on my feet.  


    I didn't really modify the pattern much, I just knit the leg to 3" before starting the heel flap, as that is as much leg as I like, and then for the heel I did a regular heel flap and gusset combo rather than the short row heel in the pattern.  Again, I made this decision to change the heel construction due to the high arches.  For the toe I followed the pattern exactly.  It was a really easy pattern to memorize, the chart only had two rows on it and it was an 8 stitch repeat, so they went really quickly.  

    I am happy with the pattern, but not so sure about the colors, they are kind of bright.  I am beginning to realize as much as I love all the crazy colored sock yarns I don't know that I am quite ready to wear them.  And now that my small project bag is empty it's time to fill it up with holiday knitting.  Starting Executive Funk for Chatty-Cathy next, yea, something other than socks for awhile!

    Thursday, July 21, 2011

    Finally learning to quilt

    To be honest I have kind of quilted before, but it was a Hawaiian applique style quilt so not quite the same thing as a pieced quilt.  A few friends of mine quilt, Crafty Auntie and The QuiltMaster, and their beautiful projects have finally inspired me to get started on learning this craft myself in spite of being terrified of having to cut a very straight line.

    Since I often suffer from startitis, to force myself to get my act together and get the fabric ready by a certain date I set up a crafting party for this weekend so I can get help cutting out all the pieces in preparation for sewing it all together. I could ostensibly cut them out myself, but the chances of them beign square if I do it with my limited supplies is slim to none.  The QuiltMaster offered up her rotary cutter, board, and whatever fancy rulers she has to help me get everything cut out.


    For my first project I decided to make a really basic quilt for Destructo Boys' crib, well now it's a toddler bed since we pulled the drop down rail off about a year ago.  I think it would look so much nicer with a quilt on top instead of just a sheet.   I found some free patterns online and the one that most caught my eye was the Big Block quilt from Claudia's Quilt Shoppe.  It looks simple enough for me to get some instant satisfaction, but enough different with the borders to keep me interested in it.  Best of all it should give me some instant satisfaction so I can learn how to put a quilt together rather easily so I can make more!

    Since I went out and got my fabric for the blocks, sashing, and borders I should be all ready to go for this weekend.  I found some great prints with hot rods and woodies at the beach for the blocks and a really pretty mottled blue to use for the sashing and borders that seems to have all the blues that are in the other fabrics in it.  For the lining I am waiting until I have more time to go through the less expensive flat folds at my local fabric store, for some reason spending $30 on the back of the quilt just makes me sick,  It is great fabric, by Hoffman, but that is still a bit pricy for me.  I suppose I should pre-wash the fabric already purchased to make sure if there is any shrinkage it happens now and not after the quilt is all assembled. Wish me luck!

    Friday, July 15, 2011

    Kudzu shawlette


    The main reason I decided to even make this shawl (beyond the whole, ooh pretty knee jerk response) was to get my mind back into the lace knitting mindset before I started on a wedding veil for Crafty Auntie.  Kudzu was the KAL for the Beginning Lace Knitters group on Ravelry for June and as soon as I saw it I added it to my favorites thinking I would get to it some day.  Then I realized I was planning on making the veil out of kidsilk haze which I hear is a rather difficult yarn to knit with so thought maybe working on something that gets me back into the place of mind I need to be to work on lace just might be a good idea.  Then of course Knit Picks went and had a summer sale, I was a goner I tell you (yes, I bought much more than just the yarn for this shawl, darn their sales)!


    The pattern is really easy to follow and is both written out and charted, I loved how I was able to memorize the short repeats in no time at all, which was nice since the rows were incredibly looong!  There was a time halfway thorough where I though I'd never get done but that feeling went away pretty quickly thankfully.  I think the yarn is a pretty good match to the pattern too, it's KP Comfy sport in the honeydew color, of course it wasn't on sale, but the yellow yarn that was the backup color I ordered was which will end up being a top for Lil' Miss someday.  It is so soft too, definitely feels like your favorite cotton t-shirt as some have commented, I just want to cuddle up with the thing!  The nice cotton/acrylic blend is perfect for wearing here in sunny So Cal on those days or evenings when there is just a hint of coolness in the air.


    I have now decided this crescent shape is my favorite for shawls, I have a rectangular shawl that I barely wear and did try on the various triangular ones I made as gifts last Christmas but this shape is definitely best for me.  Since it has a nice curve to it already it tends to stay put much better, which is my main complaint with shawls I hate how they fall off the shoulders, when I put something on I expect it to stay where I put it, I don't want to have to repeatedly mess with my clothes.  Apparently The Momster likes it too, she was seriously coveting this shawl over the weekend at a barbeque we had.  I think I know what her Christmas gift will be, now just to settle on a pattern, maybe Indian Feathers but with heavier yarn...