At long last, here is the interchangeable knitting needle case tutorial I promised to put together in a previous
post. As my collection of interchangeables grew I needed a place to store them safely (
the needle roll I had already made just didn't work for them) and I as am too
cheap thrifty to purchase a ready made case, I decided to design and sew one just for them. And now you can too with this handy dandy step by step tutorial!
* {a PDF of this tutorial is located
here}
First gather your materials:
- Two 11 3/4" x 17" pieces of fabric for outside of case and for lining (I used basic cotton for all my fabrics)
- 11 3/4" x 10 1/2" piece of fabric for cable pocket
- 11 3/4" x 9 1/2" piece of fabric for needles pocket
- 11 3/4" x 8" piece of fabric for pocket on bottom flap
- 2" x 4" piece of fabric for button loop
- 6" x 8" piece of fabric for zippered pocket lining
- 11 3/4" 17" piece of interfacing (whichever weight you prefer, I used doubled up lightweight as that was what I had on hand)
- 11 3/4" x 17" piece of batting
- 7" zipper
- button
 |
| all ready to start assembly |
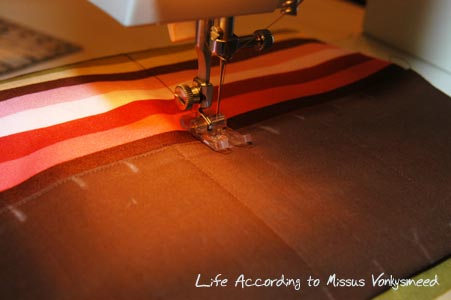
First you will need to prepare the fabric that will make the pockets your needles and cables will be slipping into later. Fold the pocket pieces of fabric in half lengthwise, making them 11 3/4" x 5 1/4" & 11 3/4" x 4 3/4" respectively, then sew with a 3/4" seam allowance along the edge of each (
I can't cut a straight line to save my life, so my seam allowance tends to be shall we say, generous!). After sewing snip off excess fabric, fold both tubes right side out and press the seams and and folded edges.
Then you'll want to make a fabric sandwich by layering together the interfacing, batting and lining fabric. On top of this sandwich pin the needle pocket fabric 5 3/4"" from the top edge of the lining (
this is where the openings to slip in the needles will be) and sew along the bottom edge of the pocket fabric. I like to position the pocket fabric so the top edge of the pocket fabric is the creased fold you pressed earlier, as I think it makes for a cleaner looking opening to the pockets this way.
 |
| layers of the fabric sandwich |
 |
| placement of the needle pocket fabric |
 |
| sewing along bottom on needle pocket fabric |
Next, mark where the seams dividing the needle pockets are going to be located with a cloth marking pen. Start by dividing the width into thirds, which is approximately 4" in from each side and then make marks 7/8" apart in between these first marks and out to 1 1/2" away from the edges of the fabric (
no need to sew lines in the seam allowance area!). I made these marks top and bottom to ensure straight lines would be sewn. Sew from the bottom to the top of the needle pocket along these marks except for those first 2 marks you made at 4" in from each side; these will be sewn later when the cable pocket fabric gets layered on top. Make sure to leave enough thread on all these seams to pull both ends through to the interfacing side to knot together and cut off the excess.
 |
| marking for seams to divide needle pockets |
 |
| sewing from bottom to top to keep fabric smooth |
After sewing the needle pockets, pin the cable pocket fabric 1 1/2" below the top of the needle pocket fabric, (
where the openings for the needles to go are) and sew along the bottom of the cable pocket fabric. Remember those first two marks you made on the needle pocket fabric that you didn't sew? Well, now you get to sew them, from the bottom of the cable pocket fabric to the top of the needle pocket fabric, if needed transfer the marks down to the bottom of the cable pocket fabric to ensure straight lines. Turn the whole thing over and make sure each of the threads gets pulled through, knotted and trimmed.
 |
| placement of cable pocket fabric atop needle pocket fabric |
 |
| transferring marks to the bottom of the cable pocket fabric |
 |
| sewing the pockets for cables from the bottom to the top |
For the zipper and zippered pocket insertion I partially followed a
tutorial by Lisa of U-Handbag (
I am fairly new at sewing zippers after all!) which I found to be
fantastic and a much easier method than my previous attempts at putting zippered pockets into linings. If you have a preferred method of your own, by all means do that instead if you wish! I followed Lisa's great instructions with a few exceptions, including (
but not limited to!) not using interfacing for the zippered pocket as all it will hold are small, lightweight items. Make the sewn box for the zipper per Lisa's tutorial with the center line that you will cut positioned 1 3/4"" from the top of the needle pocket fabric. Make the opening for the zipper 6 1/2" long. After the pocket lining has been turned right side out, pressed, and the zipper has been sewn on simply fold the pocket fabric up in half to sew closed instead of layering another piece of fabric on top to make the pocket per Lisa's tutorial. Remember when making the zippered pocket to fold the interfacing and batting out of the way so all you are sewing is the lining fabric, zipper pocket fabric and the zipper.
 |
| zipper hole, see the untouched batting & interfacing | | |
 |
| after judicious pressing & pinning of the zipper |
 |
| fold the pocket lining fabric in the direction of the arrow |
Now to make the button loop out of the 2"x4" fabric, fold it in half lengthwise (1"x4") and press, then fold the outer edges into the crease and press it flat again. Fold along the first crease and iron flat once more. Sew the open edge closed, with approximately 1/8" seam allowance. Pin the to the top center of the lining fabric sandwich, at the end where the zipper is, with the raw fabric edges all lined up together and the loop to the inside of the lining.
 |
| button loop, pressed in half and then pressed again |
 |
| button loop pinned in preparation for sewing |
Next fold the bottom flap pocket fabric in half and press, then pin it to the bottom of the lining fabric sandwich at the opposite end of where you just placed the zipper pocket and button loop.
* Layer the outer fabric on top of everything with right sides together, pin around the edges. Sew it all together 3/4" in from the edge leaving a 4" opening to pull the case right side out. I sewed in a curve around the corners as I think it looks nicer than right angles, but do the corners however you prefer. Trim excess fabric all around, turn right side out, and press all seams. Hand stitch the opening at the bottom of the case closed.
 |
| placement of bottom fold pocket fabric |
 |
| stitched and ready to turn right side out |
 |
| turned right side out and pressed |
For added stability I sewed a top stitch all around the outside edge of the case 3/8" in from the edge. Next you will top stitch at the two places where the case will fold to close, for the first fold stitch from side to side inside of the outer top stitching at 1" above the top of the needle pocket fabric, and at 1/4" above that seam. The second fold is located at the bottom of the cable pocket fabric, sew along the bottom edge of the cable pocket fabric and 1/4" above that seam. Pull all loose threads through to the lining side, tie off and snip excess.
 |
| placement of stitching for top fold |
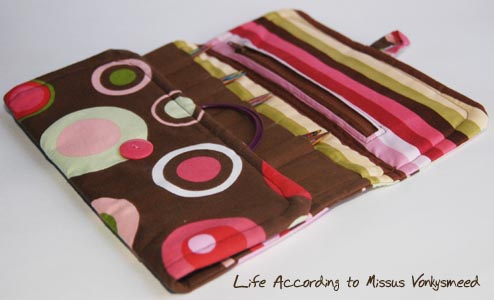
Fold the case into thirds to position the button so the loop will go around it to keep the case closed and hand sew the button on through only the outer fabric. Then load up all your interchangeable needle goodness and pat yourself on the back for saving a bunch of money by making it for yourself!
 |
| finished measurements open 6 5/8" x 15 3/8", closed 6 5/8" x 9 7/8" |
Please let me know if you have used this tutorial with success, or if you have had any problems with it. I am still very new at writing how-to's and tutorials so may have not made something as clear as I could have. And please enjoy sewing yourself a useful item, I know I sure did!
*measurements are for needle tips up to 4 1/2" in length, for longer needles the needle pocket can be made up to 1 1/2" longer finished size with no changes to other directions
*this pocket can also be made to hold additional needles by cutting the pocket fabric to the same dimensions as the needle pocket, sewing pocket dividing lines as per the needle pocket instructions, and adding 1" to the length of the outer and lining fabrics, interfacing and batting.


Hey there is there a link to Lisa's tutorial? If so, it would be good to include that in the post where you reference it. I'm not much of a seamstress these days so I can't really comment on your tutorial itself but it looks good.
ReplyDeleteYup, already put that link in! Thanks for your input.
ReplyDeleteThat's beautiful! Thanks for the tutorial.
ReplyDeleteThank you & you're welcome!
ReplyDeletecan you send me a direct link to the google doc PDF file? for some reason, my new computer just doesn't like google docs! :)
ReplyDeleteI would be happy to but I need your email to send it to you. If you'd like you can contact me via email by the link just below my profile at the top left of my blog page.
ReplyDeleteWow, this is a really great and informative post. I will definitely be bookmarking this for when I'm feeling crafty in the future, thank you so much!
ReplyDeleteThank you! Thank you! Thank you! I just got a set of interchangeable needles but I hate the case they came in and was contemplating sewing my own - planning to start as soon as I convince my toddler to take her nap! =0)
ReplyDeleteHi :)
ReplyDeleteI LOVEEEEEE your needle case! Well done! and thankyou so much for posting a tutorial!
I am going to try and make one, but I would like it to have some more needle spaces, do you know a way that i could add more?
:)
You are welcome and thank you!
ReplyDeleteWell, you could make the entire case wider, or just layer another pocket piece. So you would have 2 needle pocket pieces and then the cable pocket piece. I would make the whole length of the case a little longer to compensate for the extra needle pockets. Hope this helps!
This is awesome thank you!
ReplyDeleteThanks for sharing this - I LOVE my knit pro interchangeable's & have now assembled all of my fabrics ready to make this!
ReplyDeleteI was just wondering what size button you need? (ie what diameter?) Thanks!!!
I think my button was about 1" diameter, but you can use whatever size button you like since you'll be making your own button loop.
ReplyDeleteGlad you like the pattern!
Just finished making mine. Changed a few things, my zip is 1" from the top of the lining (Lisa's tutorial made it so simple)(and only because I mis-read the instructions in my haste and didn't notice until I'd made the hole!!) and I have 2 needle pockets in the middle and converted the bottom pocket into the cable pocket. Just waiting for my interchangeable needles tomorrow (it's my birthday and my boyfriend has ordered me a set).
ReplyDeleteThanks for a lovely straight forward pattern to follow.
Thanks for the comment Hannah! I am so glad the pattern worked for you and yea on getting a whole set of interchangeables! I love mine and never use my straights anymore.
ReplyDeleteThank you so much for this tutorial. The case is exactly what I had in mind for storing my Options needles.
ReplyDeleteHas anyone tried making this with flannel?
ReplyDeleteNot that I am aware of, but I think it would work just fine!
ReplyDeleteThis is pretty neat.. Do you mind if I print the tutorial out for my personal reference..
ReplyDeleteNot a problem at all, print away! I'm glad you like the tutorial.
DeleteThis is a great tutorial. One thing I changed on my case was to use a hair elastic as my button loop. I am getting ready to make another one for a friend.
ReplyDeleteThanks for the comment, and that is a great idea for the button loop! Happy sewing!
DeleteDo you have a downloadable PDF file? The link to the one on line can't be saved as a PDF in iBooks on my iPad.
ReplyDeleteDo you also have a contact addy that I can e-mail you my addy?
The link is in the very topmost paragraph {a PDF of this tutorial is located here}, just click on 'here' and it takes you to the pdf located on google docs.
DeleteThis comment has been removed by the author.
ReplyDeleteI have just found this tutorial and have made my case. I will be putting it on my blog with a link back to here! I did the zip pocket a different way,,,, couldn't figure out the other way!!
ReplyDeletegreat case to hold my new circular needle passion. Thanks for sharing
ReplyDeleteThank you so much for this tutorial, it's just what I was looking for. I found it very easy to follow. The only comment I would make is that if, like me, you want to store big size needles, e.g. 8mm, 10mm, 12mm then you need to make the needle pocket wider because they take up more fabric. Probably need to fit the needles as you go along to make sure you sew the lines in the right place. I didn't do that and the sides of the case are puckering at the back because the needles are pulling the sides in. Doesn't bother me though, I just needed something to store my needles in and it certainly does the job! Thanks again.
ReplyDelete