Showing posts with label sewing. Show all posts

Sunday, July 8, 2012

The Magical Mystery Sewing Machine Tour!

I got bit by the quilting bug, badly apparently as this just came home with me on Friday.

tldr; Hey!  I shopped around & got a new sewing machine!

It all began because of the quilt I am making for Lil' Miss (isn't it easier to blame our foibles on someone else?) I looked at the meager machines available for sale at my JoAnn's while I was there buying fabric to back her quilt.  They were Singer's and none too fancy, a whole lot more expensive than my current Singer but just didn't seem to have the extra harp space I was interested in.  So I went home, thinking about how maybe it was time to upgrade my machine.  I looked online, I perused various blogs and discussions about which manufacturer was best and tried to compare as best I could.  Which sounds great, but have you ever tried to find the price of a sewing machine online?  It's like they're a national secret or something!  I finally realized I just need to make a trip to my local sewing machine dealer.

Happily my closest dealer is in the same shopping center as my JoAnn's and since I needed to get some batting anyway...  So I went in and told the nice salesguy what I was looking for, a machine good for a novice quilter.  He starts showing me this lovely machine, demonstrating what it does and all the cool bells and whistles on it as I am coming to the realization that this machine is way out of my league.  So I ask how much it is and almost loose my bladder right there on the floor, $2399 plus tax!  This is so beyond the budget I had in mind of $500 that it is just sad.  I explained there was a monetary constraint to this purchase and did they have anything more in my price range.

He showed me a perfectly serviceable used machine (who knew a 20 year old machine would sell for $500!) and their limited selection of lower priced machines, yes, $500 is lower priced in the world of sewing machines.  As he was getting call away to assist another customer he mentioned the machines up by the front window that were their best-sellers, Pfaff Amitions, and that the store did offer financing.  I looked at them but was feeling so overwhelmed that I needed to go home and resume my internet searching for these specific models now that I had narrowed the field somewhat.

Have I mentioned that shopping for a sewing machine has a lot in common with shopping for a car?  Trade-in's, financing, servicing plans, oh my!  Anyway I came home and resumed my search, looking specifically at the Pfaff Ambition line, because with the 0% interest financing I could definitely swing it.  The reviews overall for these machines were glowingly positive and everyone seemed to love the built in walking foot.  Although the used machine was perfectly nice, I will admit I wanted something new, I like me some bells and whistles.

meet Pfrannie Pfaff... I think we are going to be good friends, she and I

I was able to pick the brains of my friends in regards to my sewing machine quest and their advice was to test drive any machine before I purchsed it.  Their preferred brands were Viking and Bernina, but since Bernina is so far beyond my means I didn't even consider it.  As for the Viking I found that the Sapphire line seemed comparable to the Pfaff Ambition line, and after further research I focused in on the Sapphire 835.  I located my local dealer for their machines and planned to go test driving the next day with my 2 selections in mind, the Viking Sapphire 835 vs the Pfaff Ambition 1.5/

I charged up my ipod to entertain the monkeys while I was doing my test drives and got an early start the very next day to compare one right after the other.  The very nice sales lady at the Viking dealer went over the machine with me, not pushy at all and answered all my questions.  What I particularly liked about it was that there was more harp space than the Pfaff, about 1.5", and when you take your foot off the pedal the presser foot automatically lifts, a nice feature for doing straight line quilting.  I did not like that there was not a bobbin sensor for the model I was looking at (every damn time I sew I run out of bobbin thread and don't notice until at least a foot of fabric has gone under the needle, so this was a priority feature for me), and even on sale this machine was $100 more than the Pfaff with less stitches available and no integrated walking foot, a separate one would have to be purchased for another $100.  Additionaly, this dealer did not offer any financing or trade-in rebate.

At our second visit to the Pfaff dealer I homed right in on the machine I was interested in and the sales guy there went through a whole demonstration of all the features of the Ambition 1.5 for me, again he answered every question I asked kindly and with respect.  After sewing on it a bit, I was pretty happy with it and was ready to ask about pricing.  Turns out it was on sale, plus they offered trade in credit, and financing with a minimum $1000 purchase.  I really liked the integrated walking foot, the huge selection of 196 stitches including 4 alphabets, and the specialty buttonhole foot on the Pfaff.  The financing deal was the final trigger though, both machines were great but the ability to stretch those payments out over a year at no interest was what got me to pick the Pfaff, plus the offer of free classes on how to use the machine, a free service at one year, and the ability to trade up in one year while being cresited for the full value of the machine I just purchased (not that I will actually take advantage of this, but nice to know it's possible!).

check out all those stitches!

So yea, I am the proud owner of Pfrannie Pfaff, an Ambition 1.5.  I have barely started to play with her but I already know I will definitely need that free 'Get to know your Pfaff' class!  As typical for me though, this was partly triggered because I know to do free motion quilting you need to lower the feed dogs or cover them...guess what I found while packing up the Singer to take for the trade in?  Yup, that's right I found a cover for my feed dogs right there in the accessories storage area.  Oh well, still not sorry in the least that I upgraded, now I just have to learn how to use this fancy machine!

Monday, May 28, 2012

A Quilt for Lil' Miss

I finally got around to picking out fabrics for Lil' Miss to have her very own quilt.  Since I already made one for Destructo-boy she needed one too, plus her bedding is getting kind of sad looking and needs to be freshened up.  I found a great collection of prints from Michael Miller Fabrics called 'It's a girl thing" that called out to me.  I wasn't sure at first if it was too sophisticated for her but after consulting with a few friends at our Memorial weekend bbq I was convinced that it was something she would enjoy now and could grow into.  Because who really wants to make a quilt that after a few years the child says 'But Mom, princess ballerinas are for babies!', yeah, not me so more grown up fabrics it is for this quilt.


I wasn't even sure what kind of quilt pattern to make at first, I wanted something interesting but not too complicated for a novice quilter like myself.  I've done 2 quilts now that are essentially large squares with other fabrics used as sashing around them and want to move on and work with some piecing in the squares.  I searched for some nine patch quilt tutorials (we read the Little House books together and there were several times she wrote about them working on their  nine patch quilts) and came across this great tutorial on the blog Oh, Fransson! for a crazy nine patch lattice quilt.  Yes, it is for a baby quilt, but doubling the size of the quilt results in finished measurements really close to a full size quilt so I'll be doing this one doubled.  I am pretty excited and can't wait for the fabrics to arrive so I can start cutting out and sewing them up.

Sunday, October 23, 2011

Starting on my second quilt

fiesta de los muertos by Alexander Henry Fabrics

Since I have special ordered the fabrics off the internet I suppose I really do need to get this gift done for Mister Vonkysmeed for Christmas!  He has always been a huge fan of Oingo Boingo and has had a box full of old concert t-shirts sitting in the garage for years.  I thought it was a shame for them to be sitting in the box and suggested using them in some sort of project instead.  He agreed to this idea and I discovered a wealth of information online about t-shirt quilts.  To make sure I actually got this done I promised him a Christmas gift, and now that I have the fancy interfacing on hand and have ordered fabric I really need to get started on it!

The fabric is really amazing, part of the folklorico collection by Alexander Henry fabrics, they will definitely work with the assortment of shirts I have, 99% of which are black and at least half say Dia de Los Muertos on them.  The confetti fabric  seems almost custom made to go with Oingo Boingo!  I'll be using it for the sashing and binding around the shirts themselves, the fiesta de los muertos fabric will be used for the back.  I think I'll be using my new quilting book, The Practical Guide to Patchwork by Elizabeth Hartman to figure out how to piece the back together.  I think I may go get a few pieces of solid fabrics to work with the patterned fabrics on the back, maybe even for the binding too, I'll have to get started piecing and see what speaks to me.

The interfacing I have is amazing!  Unfortunately I have no idea what it's called or where to get it, my friend The Quilt Master bought it through a friend of hers for me.  It is essentially a very thin cotton with the fusible stuff on one side of it.  What this means is after I fuse it to the shirts they will continue to be soft and flexible instead of stiff like regular interfacing but still stable enough to cut out properly.

Now wish me luck as I go off to start cutting and fusing!

Monday, September 5, 2011

How to: Make a crochet hook case


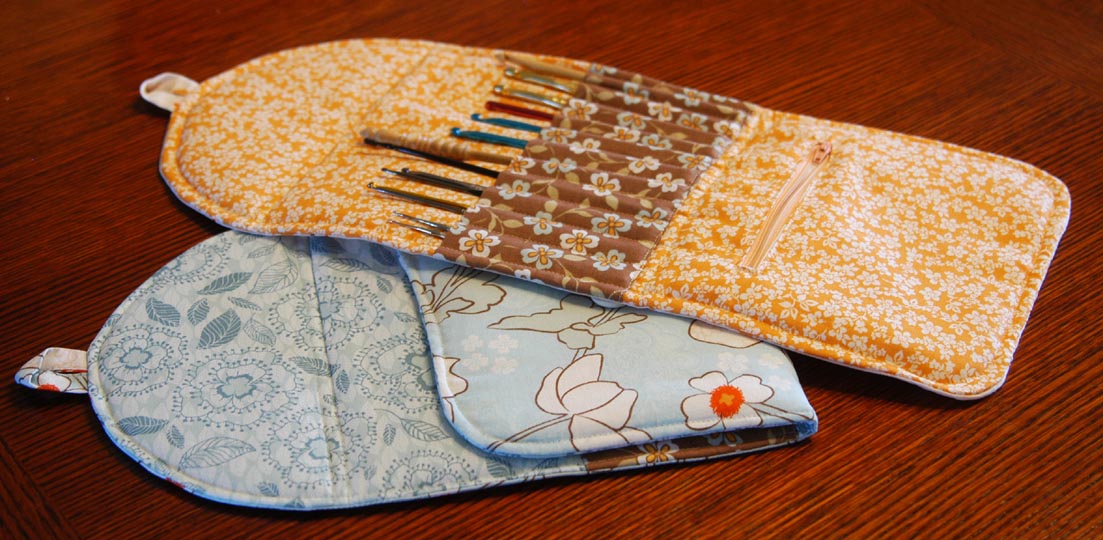
Not that there aren't some really great patterns/tutorials already available all over the net but yet again I just couldn't find quite what I was looking for.  The free tutorial available at the Moda Bake Shop blog came really close but the instructions seemed overly complicated to me and I just really didn't want to do all that.  So, taking my favorite part of that pattern, the curved flap, I reworked my interchangeable knitting needle case to fit crochet hooks.  A quick disclaimer in the size, this case was designed for long handled crochet hooks as I have a lone Brittany birch wood hook that is 8" long, so I made my case to accommodate it, if you just have the Susan Bates or Boyle hooks you can either cut out the case pieces 1 1/2" shorter and/or make adjustments to the pattern as noted in the portion of the pattern about top stitching for the folds.  So in celebration of September being National Sewing Month, let's get sewing!

the 2 cases I got out of the fat quarter pack from JoAnn's
 
First gather up your materials:
compass & cardstock template
  • Two 20 1/2" x 9 1/2" pieces of fabric for outside of case and for lining (to make the curved top I used a compass and made a half circle on a piece of cardstock to use as a cutting template for all my pieces)
  • 9 1/2" x 8 1/2" piece of fabric for hooks pocket
  • 2" x 4" piece of fabric for button loop, or make a button hole on the curved top flap
  • Two 5 1/2" x  7 1/2" pieces of fabric for zippered pocket
  • 20 1/2" x 9 1/2" piece of interfacing (whichever weight you prefer, I used heavyweight as that was what I had on hand)
  • 20 1/2" x 9 1/2" piece of batting
  • 7" zipper
  • button


    First you will need to prepare the fabric that will make the pockets your crochet hooks will be slipping into later.  Fold the pocket piece of fabric in half lengthwise, making it 9 1/2" x 4 1/4", then sew with a 1/4" seam allowance along the edge.  After sewing snip off excess fabric, fold the tube right side out and press.

    Next we'll work on the pocket in the lining.  Yet again, I used the wonderful instructions from the U-handbag blog by Lisa to install the zipper and pocket.  If you like to sew you should definitely follow her blog, great stuff there!  Anyway, I put my zipper opening centered at 5 1/2" from the bottom of the lining fabric and didn't use any interfacing for my pocket, other than that I pretty much followed her instructions exactly.  I did need to trim both ends of my zipper before sewing on the second piece of pocket fabric to close it up.

    l: before sewing; r:after zipper sewn in, before pocket lining sewn together

    Then you'll want to make a fabric sandwich by layering together the interfacing, batting and lining fabric.  On top of this sandwich pin the crochet hook pocket fabric 2" above the zipper (this is where the bottom of the hooks will be) and sew along the bottom edge of the pocket fabric.  I like to position the pocket fabric so the top edge of the pocket fabric is the creased fold you pressed earlier, as I think it makes for a cleaner looking opening to the pockets this way.  Then top stitch parallel to this seam 1/4" down from the pocket edge, this will make it easier to fold the case later. 


    placement of hook pocket above zipper

    Next, mark where the seams dividing the crochet hook pockets are going to be located with a cloth marking pen.  I made these marks top and bottom to ensure straight lines would be sewn.  Sew from the bottom to the top of the crochet hook pocket along these marks.  Make sure to leave enough thread on all these seams to pull both ends through to the interfacing side to knot together and cut off the excess.  I started in the middle at 5" in from the left edge and then sewed lines parallel to that one in 3/4" increments to make the hook pockets stopping at 1 1/2" from either edge.

    sewing parallel lines for hook pockets

    measurements for hook pockets

    Next we'll do the top stitching for the upper fold at 8" from the bottom of the hook pocket and again at 1/4" above that (if you need to make the case a little smaller for shorter hooks instead of cutting the fabric out smaller you can just do the top stitching at 6 1/2" from the bottom of the hook pocket and again 1/4" above that).

    placement of top stitching for upper fold

    Now to make the button loop out of the 2"x4" fabric, fold it in half lengthwise (1"x4") and press, then fold the outer edges into the crease and press it flat again.  Fold along the first crease and iron flat once more.  Sew the open edge closed, with approximately 1/8" seam allowance.  Pin the loop to the top center of the lining fabric sandwich, at the end where the curve is, with the raw fabric edges all lined up together and the loop to the inside of the lining.

    l: button loop folded & pressed; r: pinned to top curve

    Layer the outer fabric on top of everything with right sides together, pin around the edges.  Sew it all together 1/4" in from the edge leaving a 4" opening at the bottom to pull the case right side out.  I sewed in a curve around the bottom corners to better match the deep curve on the top flap.  Trim excess fabric all around,  turn right side out, and press all seams. Hand stitch the opening at the bottom of the case closed.  For added stability I sewed a top stitch all around the outside edge of the case 3/8" in from the edge.  Pull all loose threads through to the lining side, tie off and snip excess.

    all pinned and ready to sew shut

    hole that needs hand stitching to close

    If you chose the button loop option fold the case into thirds to position the button so the loop will go around it and hand sew the button on through only the outer fabric.  If you decided to do a buttonhole put it where you like on the upper curved flap and then hand sew on your button to the bottom flap for either option.  Ta-da!  All done.  Now go crochet something!

    finished cases, yea!

    Please let me know if you were able to understand my instructions, or if you have had any problems with them.  I sometimes over think things so may have not made something as clear as I could have.  Happy sewing!

    Wednesday, August 17, 2011

    Destructo Boy's new quilt

    Yes, already finished!  I know, not much of a shock considering what an easy pattern it was but I am still rather pleased with myself.  I am so glad I got my new walking foot for the sewing machine, it worked amazingly well and this would have been impossible to do without it.  I suspect doing the hand stitching for the binding probably took the most time, my thumb is certainly still sore from it!


    In case anyone is wondering, the majority of the cute car patterned fabric was made by Hoffman Fabrics, the blue sashing is a generic quilters cotton I picked up from Joann's and the aloha print fabric on the back of the quilt is by a company that I think is out of Hawaii that my local fabric shop carries, unfortunately the name escapes me right now.  I used some polyester batting from Joann's also since I had already washed the fabric and really didn't feel like washing the batting too.  Next time I'll use cotton batting and just wash it all together to get that nice scrunchy look.


    I am actually really excited to keep working on quilts, Lil' Miss has already asked when she is getting one.  She may have awhile to wait as I really need to make one out of Mister Vonkysmeed's concert shirts first and I have been wanting one for my bed for quite awhile now.  Then of course I was inspired by The QuiltMaster to make holiday themed wall hanging quilts too, I already have the perfect spot in mind behind the couch.  Great, just what I needed, another addictive hobby!

    Friday, August 5, 2011

    Quilt in progress

    I cannot believe how fast this thing went together!  Okay, I realize now this was a ridiculously easy pattern, but at least now I understand how quilts go together.  I still need to get the backing fabric, I already have the batting and just received a brand new walking foot in the mail so I can quilt it all together myself.  Now to figure out exactly how I want to quilt this thing, shadow quilting the seams, or just big X's across each square?


    Yes, I am already thinking about the next one, which will be a t-shirt quilt of all Mister Vonkysmeed's beloved Oingo Boingo concert shirts.  I should have that done in plenty of time for Christmas and now is a great time to start being on the look out for Day of the Dead fabric for the backing.  So I guess the Big Block quilt pattern was a pretty good introduction to what I will need to do to get that project done!
    Thursday, July 21, 2011

    Finally learning to quilt

    To be honest I have kind of quilted before, but it was a Hawaiian applique style quilt so not quite the same thing as a pieced quilt.  A few friends of mine quilt, Crafty Auntie and The QuiltMaster, and their beautiful projects have finally inspired me to get started on learning this craft myself in spite of being terrified of having to cut a very straight line.

    Since I often suffer from startitis, to force myself to get my act together and get the fabric ready by a certain date I set up a crafting party for this weekend so I can get help cutting out all the pieces in preparation for sewing it all together. I could ostensibly cut them out myself, but the chances of them beign square if I do it with my limited supplies is slim to none.  The QuiltMaster offered up her rotary cutter, board, and whatever fancy rulers she has to help me get everything cut out.


    For my first project I decided to make a really basic quilt for Destructo Boys' crib, well now it's a toddler bed since we pulled the drop down rail off about a year ago.  I think it would look so much nicer with a quilt on top instead of just a sheet.   I found some free patterns online and the one that most caught my eye was the Big Block quilt from Claudia's Quilt Shoppe.  It looks simple enough for me to get some instant satisfaction, but enough different with the borders to keep me interested in it.  Best of all it should give me some instant satisfaction so I can learn how to put a quilt together rather easily so I can make more!

    Since I went out and got my fabric for the blocks, sashing, and borders I should be all ready to go for this weekend.  I found some great prints with hot rods and woodies at the beach for the blocks and a really pretty mottled blue to use for the sashing and borders that seems to have all the blues that are in the other fabrics in it.  For the lining I am waiting until I have more time to go through the less expensive flat folds at my local fabric store, for some reason spending $30 on the back of the quilt just makes me sick,  It is great fabric, by Hoffman, but that is still a bit pricy for me.  I suppose I should pre-wash the fabric already purchased to make sure if there is any shrinkage it happens now and not after the quilt is all assembled. Wish me luck!

    Friday, January 14, 2011

    How to: Make a tote bag for knitting, crafting or toting

    I can't believe I didn't get better pictures before gifting this...

    I do realize there are probably a million and a half free tote bag tutorials floating around on the web, but I haven't seen anything quite like mine so I thought I'd share.  I absolutely love this bag I created to hold all my various knitting projects and tools and have already made several more as gifts.  If you didn't guess on the timing of this tutorial, yup, the one pictured here was indeed a gift for a certain someone, Granola Mama in this case.  I must say with this pattern there is something I really enjoy about picking out all the various fabrics and seeing how they work together.  { it's located in PDF format here}  Here's what you'll need to make one for yourself:
    • 4 pieces of 18"x 8" fabric for the outside of the tote, one 4 1/2 " x 7 1/2" for the closure, and 2 more pieces 4 1/2" x 28" for the straps
    • 3 pieces of 18" x 7" contrast fabric for outside of bag
    • lining fabric 1/2 yard of 45" wide fabric
    • interfacing (I use either medium or heavy weight), 4 of 18" x 8", 2 of 18" x 7"
    • batting, 4 of 18" x 8", 2 of 18" x 7"
    • fusible interfacing, enough for the straps and closure fabric
    • zipper (if you wish to put in a zippered pocket, you'll need some extra pieces of fabric also)
    • button or velcro
    It is actually a pretty straight forward design (since I came up with it I'd be really surprised if it were anything but dead simple!) and doesn't require any fancy stitch work, well at least not anything I'd consider fancy.

    materials all assembled and ready to sew!

    Friday, October 29, 2010

    Costumes for Halloween


     Why oh why did I decide to make them myself rather than just buying them?!  Hmm, maybe because I am an idiot?  Or maybe because I'd feel guilty being a stay at home mom if I didn't?  Regardless of why, I decided to do it and boy am I sorry!  It has probably ended up costing about the same to sew the costumes for the kids as it would to simply purchase them already done.  Then besides the money spent is the vast amount of time involved, it takes quite a bit of time to cut out the fabric, sew it, press it, finish it...  Although, the kids get something really personalized out of the deal.

    Lil' Miss has decided she wants to be Super Girl for Halloween, now before you get all excited this is not the Super Girl of Superman fame, she came up with this idea independently.  Here's the best part, when I asked her what her superpower was (because most heroes have special powers dont'cha know!) she informed me that Super Girl brings rainbows to people.  Yes, rainbows.  And what is special about that exactly, well it keeps changing.  At first she brought rainbows to teach people their colors, but now it has morphed into being a kind of replicator (where the food comes from in Star Trek for you non-geeks) that pops out fruits and veggies with special rainbow dots on them.  Does my kid have an imagination or what?!

    Since every hero needs a nemesis (now imagine that word being used correctly by a 5 year old playing with her My Little Ponies and you have some insight into my world!) Super Girl is faced with the catastrophic powers of Destructo-boy!  Yes, we the parental units are really imaginative, aren't we.  Seriously, with a nickname like that how could he be called anything else?  With the window rapidly closing on how many years we get to dress them in coordinating outfits I like to take advantage of it as I can.

    Sadly, we the adults don't really get to play along this year as we have in years past.  Lil' Miss has always had an entourage with her, Mister Vonkysmeed and I, Grumpy, Chatty-Cathy, and Kako Grikor all tag along with her on the special day, and after the first year we have all dressed up right along with her.  I think her Alice in Wonderland year was a favorite of the neighborhood, I was the Cheshire Cat, The guys were all cards, and Chatty-Cathy dressed up as the Red Queen.  I guess we'll all just be mild-mannered citizens according to Mister Vonkysmeed, at least the kids are happy, isn't that what really matters?

    Monday, July 26, 2010

    I have officially lost my mind...


    Because I have decided to finally start on a long planned project, a Hawaiian applique quilt for my bed.  (shout out to Paige from Paper Starfish, whose lovely quilting projects have finally given me the inspiration I needed!)  I have previously made a fall duvet set and a winter duvet set for my bed including dust skirt, duvet cover, pillow shams for standard and european pillows, all without the use of a pattern, yea me!  Our current spring set is a purchased one that will be replaced, eventually.  I have wanted to make something cool for summertime for awhile now and I do believe a Hawaiian quilt would be perfect during the heat, it's just such a overwhelming, scary, freaking massive big project to take on!


    Mister Vonkysmeed and I have been to Hawaii several times, and love the place.  We even bought a print of an antique map of Maui during our first anniversary visit that currently hangs over our bed (yes, I know, not a terribly bright idea in earthquake prone So Cal but I do have it on earthquake hooks so hopefully we won't get brained by it some night!).  We have admired from afar the lovely quilts for sale while there, but really couldn't afford the astronomical pricetags.  I have made a smaller lap quilt of 9 squares to use during the holidays that took 2 years to finish, so I certainly can understand why the prices are quite that high (since it's currently packed away with the Christmas decorations unable to post a pic, bummer!)!

    First I will need to pick out my designs, I have two lovely books of patterns, Hawaiian Quilting: Instructions and Full-Size Patterns for 20 Blocks by Elizabeth Root and Poakalani Hawaiian Quilt Cushion Patterns & Designs, Vol. 4 by Poakalani & John Serrao provided by Mom-in-Law that I have to pick from.  I am currently debating if I want to make it a true sampler quilt with each square different or choose 2-3 patterns and just use those.  The quilt will be for a queen size bed so I'll need to make it 4 squares x 4 squares with a solid border all around the sides... I think.


    For the fabric I want to stay somewhat true to Hawaiian tradition and use solid colored fabric, probably an ecru background with a coffee or cookie dough colored fabric for the pattern to go with the colors in our room.  I want to use good quality cloth for the quilt so will be Kona cotton that I will purchase with some lovely 40% off coupons that come out from Jo-Anns every week, that will definitely help with the cost!  Now to figure out how many yard I really need to get so I can get moving on this!

    Monday, July 5, 2010

    Sewing Some Shade


    I've been doing some sewing in between knitting on my numerous wip's the past few days, making bucket style hats for both kids.  I found a great tutorial for Destructo boy's hat here on the U-Create blog, and for Lil' Miss I used a free pattern provided by Simplicity.  Both worked out pretty well, but in both cases I screwed up had some issues, so had to make judicious use of my seam ripper.

    gotta love little boys

    Something went wonky with both of the hats, different patterns but both had the same problems (hmm, perhaps sewer error?!).  I surmise some of my trouble had to do with the fact that the seams are supposed to be 1/2" in both patterns, but when I did that the hat wouldn't fit around the kids heads even when using the appropriate size.  So I seam ripped both the hats apart and did a 1/4" seam, it fit around the head then but came out rather tall, so I had to cut down the fabric on the sides of the hats about 3/4" (of course found this out after the brim had been attached resulting in more seam ripping, sigh).  You'd think I'd learn the first time too about the circumference of the hat being an issue wouldn't you?  Sadly this was not the case.  Mind you, for Lil' Misses hat I was trying to distract myself from the migraine nipping at my heels so my patience level which is naturally rather low was even worse than normal resulting in the fury frustration with the sizing issues being somewhat blown out of proportion.

    Lil' Miss opted for the brim to be the reverse fabric, cute idea missy!

    In spite of the problems, I got both patterns to work in the end and both kids now have rather cute reversible hats for the summer (if I do say so myself).  For Destructo boy's hat I even did the seams every 1/4" across the whole brim to give it a little more rigidity since I only used one layer of interfacing.  Now that I have conquered these patterns and understand how they work I am already thinking of making more for the monkeys, have to keep an eye on the remnants section at the fabric store!

    Monday, May 31, 2010

    How to: Make an interchangeable knitting needle case


    At long last, here is the interchangeable knitting needle case tutorial I promised to put together in a previous post.  As my collection of interchangeables grew I needed a place to store them safely (the needle roll I had already made just didn't work for them) and I as am too cheap thrifty to purchase a ready made case, I decided to design and sew one just for them.  And now you can too with this handy dandy step by step tutorial!*  {a PDF of this tutorial is located here}


    First gather your materials:
    • Two 11 3/4" x 17" pieces of fabric for outside of case and for lining (I used basic cotton for all my fabrics)
    • 11 3/4" x 10 1/2" piece of fabric for cable pocket
    • 11 3/4" x 9 1/2" piece of fabric for needles pocket
    • 11 3/4" x 8" piece of fabric for pocket on bottom flap
    • 2" x 4" piece of fabric for button loop
    • 6" x 8" piece of fabric for zippered pocket lining
    • 11 3/4" 17" piece of interfacing (whichever weight you prefer, I used doubled up lightweight as that was what I had on hand)
    • 11 3/4" x 17" piece of batting
    • 7" zipper
    • button

        all ready to start assembly

        First you will need to prepare the fabric that will make the pockets your needles and cables will be slipping into later.  Fold the pocket pieces of fabric in half lengthwise, making them 11 3/4" x 5 1/4" & 11 3/4" x 4 3/4" respectively, then sew with a 3/4" seam allowance along the edge of each (I can't cut a straight line to save my life, so my seam allowance tends to be shall we say, generous!).  After sewing snip off excess fabric, fold both tubes right side out and press the seams and and folded edges.

        Then you'll want to make a fabric sandwich by layering together the interfacing, batting and lining fabric.  On top of this sandwich pin the needle pocket fabric 5 3/4"" from the top edge of the lining (this is where the openings to slip in the needles will be) and sew along the bottom edge of the pocket fabric.  I like to position the pocket fabric so the top edge of the pocket fabric is the creased fold you pressed earlier, as I think it makes for a cleaner looking opening to the pockets this way.

        layers of the fabric sandwich
        placement of the needle pocket fabric
        sewing along bottom on needle pocket fabric

        Next, mark where the seams dividing the needle pockets are going to be located with a cloth marking pen.  Start by dividing the width into thirds, which is approximately 4" in from each side and then make marks 7/8" apart in between these first marks and out to 1 1/2" away from the edges of the fabric (no need to sew lines in the seam allowance area!).  I made these marks top and bottom to ensure straight lines would be sewn.  Sew from the bottom to the top of the needle pocket along these marks except for those first 2 marks you made at 4" in from each side;  these will be sewn later when the cable pocket fabric gets layered on top.  Make sure to leave enough thread on all these seams to pull both ends through to the interfacing side to knot together and cut off the excess.

        marking for seams to divide needle pockets
        sewing from bottom to top to keep fabric smooth

        After sewing the needle pockets, pin the cable pocket fabric 1 1/2" below the top of the needle pocket fabric, (where the openings for the needles to go are) and sew along the bottom of the cable pocket fabric.  Remember those first two marks you made on the needle pocket fabric that you didn't sew?  Well, now you get to sew them, from the bottom of the cable pocket fabric to the top of the needle pocket fabric, if needed transfer the marks down to the bottom of the cable pocket fabric to ensure straight lines.  Turn the whole thing over and make sure each of the threads gets pulled through, knotted and trimmed.

        placement of cable pocket fabric atop needle pocket fabric
        transferring marks to the bottom of the cable pocket fabric
        sewing the pockets for cables from the bottom to the top

        For the zipper and zippered pocket insertion I partially followed a tutorial by Lisa of U-Handbag (I am fairly new at sewing zippers after all!) which I found to be fantastic and a much easier method than my previous attempts at putting zippered pockets into linings.  If you have a preferred method of your own, by all means do that instead if you wish!  I followed Lisa's great instructions with a few exceptions, including (but not limited to!) not using interfacing for the zippered pocket as all it will hold are small, lightweight items.  Make the sewn box for the zipper per Lisa's tutorial with the center line that you will cut positioned 1 3/4"" from the top of the needle pocket fabric.  Make the opening for the zipper 6 1/2" long.  After the pocket lining has been turned right side out, pressed, and the zipper has been sewn on simply fold the pocket fabric up in half to sew closed instead of layering another piece of fabric on top to make the pocket per Lisa's tutorial.  Remember when making the zippered pocket to fold the interfacing and batting out of the way so all you are sewing is the lining fabric, zipper pocket fabric and the zipper.

        zipper hole, see the untouched batting & interfacing
        after judicious pressing & pinning of the zipper
        fold the pocket lining fabric in the direction of the arrow

        Now to make the button loop out of the 2"x4" fabric, fold it in half lengthwise (1"x4") and press, then fold the outer edges into the crease and press it flat again.  Fold along the first crease and iron flat once more.  Sew the open edge closed, with approximately 1/8" seam allowance.  Pin the to the top center of the lining fabric sandwich, at the end where the zipper is, with the raw fabric edges all lined up together and the loop to the inside of the lining.

        button loop, pressed in half and then pressed again
        button loop pinned in preparation for sewing

        Next fold the bottom flap pocket fabric in half and press, then pin it to the bottom of the lining fabric sandwich at the opposite end of where you just placed the zipper pocket and button loop.*  Layer the outer fabric on top of everything with right sides together, pin around the edges.  Sew it all together 3/4" in from the edge leaving a 4" opening to pull the case right side out.  I sewed in a curve around the corners as I think it looks nicer than right angles, but do the corners however you prefer.  Trim excess fabric all around,  turn right side out, and press all seams. Hand stitch the opening at the bottom of the case closed.

        placement of bottom fold pocket fabric
        stitched and ready to turn right side out
        turned right side out and pressed

        For added stability I sewed a top stitch all around the outside edge of the case 3/8" in from the edge.  Next you will top stitch at the two places where the case will fold to close, for the first fold stitch from side to side inside of the outer top stitching at 1" above the top of the needle pocket fabric, and at 1/4" above that seam.  The second fold is located at the bottom of the cable pocket fabric, sew along the bottom edge of the cable pocket fabric and 1/4" above that seam.  Pull all loose threads through to the lining side, tie off and snip excess.

        placement of stitching for top fold

        Fold the case into thirds to position the button so the loop will go around it to keep the case closed and hand sew the button on through only the outer fabric.  Then load up all your interchangeable needle goodness and pat yourself on the back for saving a bunch of money by making it for yourself!

        finished measurements open 6 5/8" x 15 3/8", closed 6 5/8" x 9 7/8"

        Please let me know if you have used this tutorial with success, or if you have had any problems with it.  I am still very new at writing how-to's and tutorials so may have not made something as clear as I could have.  And please enjoy sewing yourself a useful item, I know I sure did!

        *measurements are for needle tips up to 4 1/2" in length, for longer needles the needle pocket can be made up to 1 1/2" longer finished size with no changes to other directions

        *this pocket can also be made to hold additional needles by cutting the pocket fabric to the same dimensions as the needle pocket, sewing pocket dividing lines as per the needle pocket instructions, and adding 1" to the length of the outer and lining fabrics, interfacing and batting.
          Related Posts with Thumbnails