Monday, May 31, 2010

How to: Make an interchangeable knitting needle case


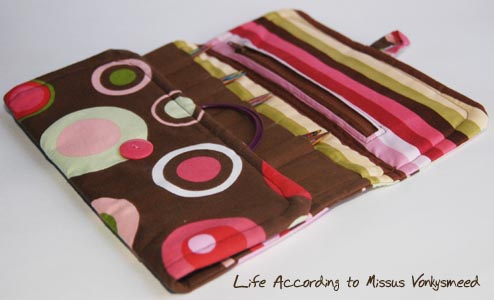
At long last, here is the interchangeable knitting needle case tutorial I promised to put together in a previous post.  As my collection of interchangeables grew I needed a place to store them safely (the needle roll I had already made just didn't work for them) and I as am too cheap thrifty to purchase a ready made case, I decided to design and sew one just for them.  And now you can too with this handy dandy step by step tutorial!*  {a PDF of this tutorial is located here}


First gather your materials:
  • Two 11 3/4" x 17" pieces of fabric for outside of case and for lining (I used basic cotton for all my fabrics)
  • 11 3/4" x 10 1/2" piece of fabric for cable pocket
  • 11 3/4" x 9 1/2" piece of fabric for needles pocket
  • 11 3/4" x 8" piece of fabric for pocket on bottom flap
  • 2" x 4" piece of fabric for button loop
  • 6" x 8" piece of fabric for zippered pocket lining
  • 11 3/4" 17" piece of interfacing (whichever weight you prefer, I used doubled up lightweight as that was what I had on hand)
  • 11 3/4" x 17" piece of batting
  • 7" zipper
  • button

      all ready to start assembly

      First you will need to prepare the fabric that will make the pockets your needles and cables will be slipping into later.  Fold the pocket pieces of fabric in half lengthwise, making them 11 3/4" x 5 1/4" & 11 3/4" x 4 3/4" respectively, then sew with a 3/4" seam allowance along the edge of each (I can't cut a straight line to save my life, so my seam allowance tends to be shall we say, generous!).  After sewing snip off excess fabric, fold both tubes right side out and press the seams and and folded edges.

      Then you'll want to make a fabric sandwich by layering together the interfacing, batting and lining fabric.  On top of this sandwich pin the needle pocket fabric 5 3/4"" from the top edge of the lining (this is where the openings to slip in the needles will be) and sew along the bottom edge of the pocket fabric.  I like to position the pocket fabric so the top edge of the pocket fabric is the creased fold you pressed earlier, as I think it makes for a cleaner looking opening to the pockets this way.

      layers of the fabric sandwich
      placement of the needle pocket fabric
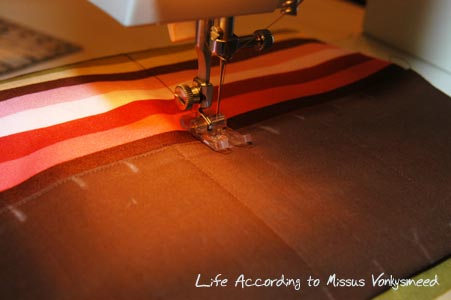
      sewing along bottom on needle pocket fabric

      Next, mark where the seams dividing the needle pockets are going to be located with a cloth marking pen.  Start by dividing the width into thirds, which is approximately 4" in from each side and then make marks 7/8" apart in between these first marks and out to 1 1/2" away from the edges of the fabric (no need to sew lines in the seam allowance area!).  I made these marks top and bottom to ensure straight lines would be sewn.  Sew from the bottom to the top of the needle pocket along these marks except for those first 2 marks you made at 4" in from each side;  these will be sewn later when the cable pocket fabric gets layered on top.  Make sure to leave enough thread on all these seams to pull both ends through to the interfacing side to knot together and cut off the excess.

      marking for seams to divide needle pockets
      sewing from bottom to top to keep fabric smooth

      After sewing the needle pockets, pin the cable pocket fabric 1 1/2" below the top of the needle pocket fabric, (where the openings for the needles to go are) and sew along the bottom of the cable pocket fabric.  Remember those first two marks you made on the needle pocket fabric that you didn't sew?  Well, now you get to sew them, from the bottom of the cable pocket fabric to the top of the needle pocket fabric, if needed transfer the marks down to the bottom of the cable pocket fabric to ensure straight lines.  Turn the whole thing over and make sure each of the threads gets pulled through, knotted and trimmed.

      placement of cable pocket fabric atop needle pocket fabric
      transferring marks to the bottom of the cable pocket fabric
      sewing the pockets for cables from the bottom to the top

      For the zipper and zippered pocket insertion I partially followed a tutorial by Lisa of U-Handbag (I am fairly new at sewing zippers after all!) which I found to be fantastic and a much easier method than my previous attempts at putting zippered pockets into linings.  If you have a preferred method of your own, by all means do that instead if you wish!  I followed Lisa's great instructions with a few exceptions, including (but not limited to!) not using interfacing for the zippered pocket as all it will hold are small, lightweight items.  Make the sewn box for the zipper per Lisa's tutorial with the center line that you will cut positioned 1 3/4"" from the top of the needle pocket fabric.  Make the opening for the zipper 6 1/2" long.  After the pocket lining has been turned right side out, pressed, and the zipper has been sewn on simply fold the pocket fabric up in half to sew closed instead of layering another piece of fabric on top to make the pocket per Lisa's tutorial.  Remember when making the zippered pocket to fold the interfacing and batting out of the way so all you are sewing is the lining fabric, zipper pocket fabric and the zipper.

      zipper hole, see the untouched batting & interfacing
      after judicious pressing & pinning of the zipper
      fold the pocket lining fabric in the direction of the arrow

      Now to make the button loop out of the 2"x4" fabric, fold it in half lengthwise (1"x4") and press, then fold the outer edges into the crease and press it flat again.  Fold along the first crease and iron flat once more.  Sew the open edge closed, with approximately 1/8" seam allowance.  Pin the to the top center of the lining fabric sandwich, at the end where the zipper is, with the raw fabric edges all lined up together and the loop to the inside of the lining.

      button loop, pressed in half and then pressed again
      button loop pinned in preparation for sewing

      Next fold the bottom flap pocket fabric in half and press, then pin it to the bottom of the lining fabric sandwich at the opposite end of where you just placed the zipper pocket and button loop.*  Layer the outer fabric on top of everything with right sides together, pin around the edges.  Sew it all together 3/4" in from the edge leaving a 4" opening to pull the case right side out.  I sewed in a curve around the corners as I think it looks nicer than right angles, but do the corners however you prefer.  Trim excess fabric all around,  turn right side out, and press all seams. Hand stitch the opening at the bottom of the case closed.

      placement of bottom fold pocket fabric
      stitched and ready to turn right side out
      turned right side out and pressed

      For added stability I sewed a top stitch all around the outside edge of the case 3/8" in from the edge.  Next you will top stitch at the two places where the case will fold to close, for the first fold stitch from side to side inside of the outer top stitching at 1" above the top of the needle pocket fabric, and at 1/4" above that seam.  The second fold is located at the bottom of the cable pocket fabric, sew along the bottom edge of the cable pocket fabric and 1/4" above that seam.  Pull all loose threads through to the lining side, tie off and snip excess.

      placement of stitching for top fold

      Fold the case into thirds to position the button so the loop will go around it to keep the case closed and hand sew the button on through only the outer fabric.  Then load up all your interchangeable needle goodness and pat yourself on the back for saving a bunch of money by making it for yourself!

      finished measurements open 6 5/8" x 15 3/8", closed 6 5/8" x 9 7/8"

      Please let me know if you have used this tutorial with success, or if you have had any problems with it.  I am still very new at writing how-to's and tutorials so may have not made something as clear as I could have.  And please enjoy sewing yourself a useful item, I know I sure did!

      *measurements are for needle tips up to 4 1/2" in length, for longer needles the needle pocket can be made up to 1 1/2" longer finished size with no changes to other directions

      *this pocket can also be made to hold additional needles by cutting the pocket fabric to the same dimensions as the needle pocket, sewing pocket dividing lines as per the needle pocket instructions, and adding 1" to the length of the outer and lining fabrics, interfacing and batting.

        Thursday, May 27, 2010

        Shoes, shoes, shoes!


        Shoe obsessed?  Not me, just the rest of my family.  Don't get me wrong, I can admire a beautiful pair of shoes almost as much as the next girl, but comfort overrules fashion and I cannot stomach the thought of dropping a whole paycheck on one pair.  When it comes to my shoes I love my slides and prefer flats over heels, although I still have a collection of heels from my working days but rarely wear them.  I prefer running around barefoot the majority of the time, this is So Cal after all!  The rest of the family however, well, they love shoes enough to make up for me.

        Mister Vonkysmeed seems to always be buying new shoes although some of that may be due to the fact that he is incredibly tough on them.  He does have quite a bit more pairs than I do and I am constantly tripping over a variety of shoes that have been left out.  Once they are all worn out and tired looking it is like pulling teeth to get him to part with them.  Often they go to the garage to serve as footgear whilst doing home or car repair before finally making their way to the landfill in the sky.  I honestly don't understand the attachment!  The Momster-in-Law told me a story once about a certain pair of red high heels of hers that he loved so much he hid them in his hamper, repeatedly.  Fortunately for me he seems to have outgrown this  particular attraction to women's shoes!

        Our Lil' Miss and Destructo-boy take after their daddy in this regard, both are just as crazy about shoes as he is.  Lil' Miss loves to pick out her shoes each day, often making the most imaginative sock/shoe/clothing combinations (I swear that kid is a walking rainbow of clashing shades some days!).  And boy does she love to shop for shoes!  It started pretty young, around 18 months if I had to guess, whenever we went out to get her new shoes we had to leave the new pair on her feet or else she would protest loudly at their removal, just let it be, after all they were being purchased for her!  Nowadays the crying has given way to whining, especially when we decide against a pair of shoes.  Now if I could just get her to take better care of the shoes she has as she is almost as tough on them as her daddy!  Destructo-boy, well, he is another story altogether...

        If you make the mistake of entering our home and removing your shoes don't expect them to be there when you go to leave.  Destructo-boy loves shoes, all kinds of shoes be they big, little, men's, women's it doesn't matter to my boy.  He'll put them on wherever he finds them and then go running waddling off with them barely on his feet.  Both Lil' Miss and I have to remember to always close our closet doors or else return to find our shoes scattered all over the house;  although it seems to be more of a problem with hers than with mine, especially the silver sparkly ones she wore for the holidays.  I can always hear when I have forgotten to close my closet door as click-clack he goes down the hall of wood flooring on a raised foundation in his latest high heeled capture! (and I thought a herd of elephants was loud, my kids put them to shame with their racket from running up and down the hall!)  I don't know what we'll do when he discovers that Mister Vonkysmeed stores his ever growing collection under the bed within easy reach, I guess we'll have to be even more careful about keeping the bedroom door closed.

        Although I prefer barefoot to shoes, maybe once I overcome my phobia and start knitting socks I'll change my mind (those teeny tiny needles and fine weight yarns are scary!).  Lil' Miss has already put in her request for me to make some handknit socks for her.  I'll have to get started on some for her soon and perhaps then I'll want to make some for myself.  I can see it now, an array of rainbow hued handknit sockies for me to slip on before I put on my slippers or my slides.  Ooh, then I'll need to buy myself some new shoes to show off the handknit socks!

        Monday, May 24, 2010

        Crafting with kids: how to make a paper lei


        Welcome to my first tutorial, this time about how to make a paper lei!  I thought it was about time for me to actually explain how I created something for your enjoyment and your own crafting fun.  {a PDF of this tutorial can be found here}  Today I am sharing a project I stumbled upon last October when Lil' Miss decided she wanted to be Lilo (yes, Destructo-boy was Stitch!) for Halloween.  I had already made a dress for her by piecing together two patterns I purchased from the local craft superstore, but she needed more than that for a Lilo costume.  She desperately needed that most well known symbol of Hawaii, a lei!  I knew that I would be able to buy her an inexpensive lei rather easily but as I have said before, I really prefer to create from what I already have if at all possible.

        After a quick perusal of my supplies I realized I already had everything I would need to have Lil' Miss help me make a lei for her to wear.  My list of supplies included:
        • A die cut machine with flower dies, card, or cartridge (I have the Slice machine by Making Memories and used Basics card #2), but a single, or an assortment, of floral punches will suffice, or even hand cut the flowers if you are especially crafty!
        • Assorted colors of construction paper or card stock
        • Yarn, long enough to form the necklace and tie it closed
        • Large/medium plastic beads, just make sure the hole is large enough to string the yarn through
        • Large tapestry needle
        We started with Lil' Miss picking out a variety of flowers she wanted me to cut out for her which I did in 3 different sizes, 1.5", 2" and 2.5", and in several different colors of construction paper.  A lei would look just as nice if it were made with all one flower of one size, and/or even all the same color.  I made about 70 flowers if I remember correctly.  Once the flowers were all cut out I had her help me put a hole in the center of each flower with a hole punch (I used the smaller punch on a Crop-A-Dile which is a great tool btw!) , this way the flowers can be strung onto the yarn.

        Once a sufficient amount of paper flowers have been cut out and punched in the middle, prepare your yarn by cutting a length long enough to drape around the child's neck with enough extra to tie it closed.  Then thread the yarn onto your tapestry needle and prepare to hand it over to an eager child with some simple instructions.  The key here is to alternate the paper flowers with the beads while stringing, as doing so will make them stand out more like a lei made with real flowers.

        At this point I let Lil' Miss take over completely, giving her total creative control over the color and floral arrangement (yes, it was very hard to watch her put the same colors next to each other and not have any pattern at all to how she put the beads and flowers on).  I particularly liked the beads we used as they are about 1/4" long so created some nice breathing space between the flowers;  Some basic pony beads would work just as well but would require more paper flowers than I used for the completed lei.


        Once you, or the eager child, have strung on enough beads and paper flowers to make a lei the length you'd like just knot the ends together and voila, a fun afternoon spent crafting together and what, I ask, is better than that! 


        Just a little FYI, as I was instructed at my Aunt's wedding many years ago, the proper way to wear a lei is not like a necklace hanging down from the back of your neck, it should be worn draped on the shoulders with half the flowers across your chest and half draped across your back.  It feels much better this way and the lovely fragrance of the flowers (well, not the paper ones, but real ones!) are closer to your nose too!

        Wednesday, May 19, 2010

        So you want me to knit you something...

        Oh, you want me to make you something, do you now?  Well, you have to be knit-worthy for me to do so.  What is knit-worthy you ask?  Let me enlighten you, it is being deserving of my time and skill to craft something unique just for you.  Yes, I am a stay at home mom, and yes I may have more down time than you (okay that was funny, as if I have down time with two kids under 5!), yes I have the skill-set, and yes, I can't sit still for 2 seconds so am always knitting/crafting but none of this means I will necessarily make something for you.  Hand crafted items take a lot of time and care and not everyone can appreciate that fact.  Although I enjoy making items with my craftiness, if I am going to spend my time making something for you I need to be reassured of a few things first:
        • You will wear it, use it, and enjoy it.  If it is destined for the back of the closet or the bottom drawer of your dresser than you can forget about me knitting/crocheting you anything.  This doesn't just mean if you don't like it and want to hide it before someone thinks you actually chose it, this also means that if you love it, use it, please don't hide it away as too 'precious' to use!
        • It will not end up in a garage sale with the tag 'reduced to .25 cents' or donated to the local thrift store.
        • You will make sure to wash it properly, if I advised you upon gifting you with the item that it would be best to turn inside out while washing and dry flat, please do so.  If it is a hand-wash item that you threw in the washer and dryer thus turning it into a cabbage patch doll sized felt apparel item, don't even talk to me for awhile, I will have heard the yarn screaming and know what you have done!  And don't count on getting anything else made for you for a very long time, if ever!
        • If I have made you something before, you darn well better have thanked me for it.  I don't require toe kissing or candy & flowers but at least a "Thank you so much, this must have taken you a lot of time!" will suffice.  Lil' Miss has perfected the thank you speech and it more often than not results in a new project being cast on for her.
        • If you effusively admire a gift I have given to another friend/family member who has already been deemed knit-worthy this might move you up to consideration as being knit-worthy yourself.  All crafters love praise and I am no exception.
        • Have a baby.  Knitters and crocheters love to make stuff for babies, and even if you are not knit-worthy (yet) your unborn progeny most definitely is.  Since I am done having little ones (and the ones I have are not babies anymore, sniff-sniff) but love all the cute baby patterns available, I need someone to make them for, and if you have some offspring you'll get something made for them!
        • I just plain have to like you enough.  There, I said it, if you are an acquaintance who I see once or twice a year it doesn't matter how nice you are or how much you admire my knitting (although if both are true why aren't you more than an acquaintance anyway?) don't count on a handmade item for you under my Christmas tree or around your birthday.
        So if you want something from me on gift giving occasions, review the above list and remember it.   Even though I said it wasn't necessary, candies (the See's assorted chocolates are my favorite) will always grease the knitting needles in your favor, just sayin!

        Saturday, May 15, 2010

        A case for Options

        I have become addicted to the interchangeable Options knitting needles offered by Knit Picks, specifically the harmony needles.  I love these things, you can change needle sizes or cable lengths easily and quickly, the cables in combination with the little end caps work great for holding your stitches for you as you finish off another part of the project.  It is also very easy to try a garment on using these as I discovered while knitting my hell-sweater.  I am also quite happy with the fact that I can fold them up rather easily to fit into a little project bag to take with me just like fixed circulars.  The needles are constructed of laminated pieces of birch wood that have been stained different rainbow colors, really quite beautiful to work with; and if I am going to be spending that much time creating something shouldn't my tools be just as beautiful as the finished object?

        They have just enough grip to hold my yarn without it falling off but are slick enough that the yarn will slide off when you need it to.  Plus they are nice and quiet, I hate the click-clacking of metal knitting needles, drives me absolutely batty!  A number of ravelers have complained of the needle tips coming out of the metal sleeve that attaches to the cable or of the whole needle unscrewing from the cable whilst knitting but I have had none of these difficulties.  I use the tightening key every time I attach the needles to a cable and make sure it is nice and tight thus eliminating any loosening problems;  and I suspect the metal sleeve issue arises from holding the wood while twisting the needle onto the cable rather than holding onto the metal sleeve itself.  I really can't say enough nice things about these needles, except that I want one in every size and I don't have them all yet!

        Recently I have found that a way is needed to store my rapidly growing collection of these suckers and with Mister Vonkysmeed being currently out of work we really don't have the funds for me to go out and buy a mass produced case for my lovelies.  Also, I like to try to create for myself if at all possible and since I made my own knitting bag, accessory pouch, knitting needle roll, and assorted project bags I decided to use what I already have and make my own case for the options needles, can't be that hard can it?  After looking at many, many images of cases for interchangeable needles online I had a design in mind, a trifold case with the needles in the center portion, the cables at one end, and a zippered pocket on the final flap to store the tightening keys and cable caps. I assembled it roughly the same way a needle case is constructed (sorry for the minimal pics of it in progress, promise to do better next time!), layering together outside fabric, then interfacing and light batting, than the inner fabric, than the pouch pieces.

        First I made prepared the fabric I would be using to make the pockets for the needles and cables by sewing a 9.5" x 11.5" piece of fabric in half (I basically made a tube), pulling the right side out and then sewing the tube to the lining fabric and the interfacing {measuring 11.5" x 18.5"} along the bottom of the future pocket.  I then made the little pockets to hold the needles by sewing straight lines about every inch along the strip of fabric I just sewed onto the lining (I sewed these lines only along the pocket fabric, lining, & interfacing, this way the seams would not be visible from the outside of the case).


        Related Posts with Thumbnails