Not that there aren't some really great patterns/tutorials already available all over the net but yet again I just couldn't find quite what I was looking for. The free tutorial available at the
Moda Bake Shop blog came really close but the instructions seemed overly complicated to me and I just really didn't want to do all that. So, taking my favorite part of that pattern, the curved flap, I reworked my
interchangeable knitting needle case to fit crochet hooks. A quick disclaimer in the size, this case was designed for long handled crochet hooks as I have a lone Brittany birch wood hook that is 8" long, so I made my case to accommodate it, if you just have the Susan Bates or Boyle hooks you can either cut out the case pieces 1 1/2" shorter and/or make adjustments to the pattern as noted in the portion of the pattern about top stitching for the folds. So in celebration of September being National Sewing Month, let's get sewing!
 |
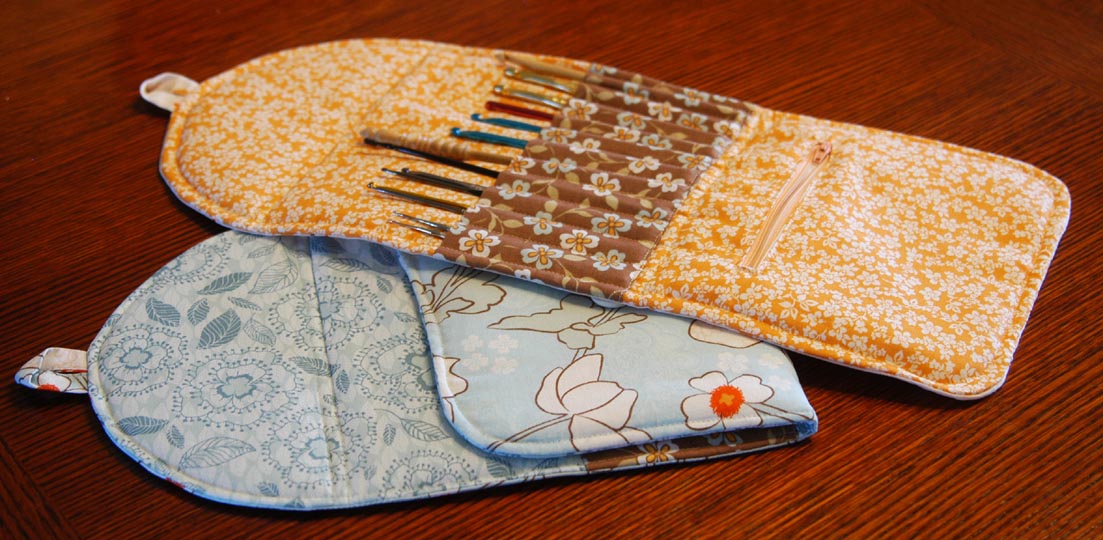
| the 2 cases I got out of the fat quarter pack from JoAnn's |
First gather up your materials:
 |
| compass & cardstock template |
- Two 20 1/2" x 9 1/2" pieces of fabric for outside of case and for lining (to make the curved top I used a compass and made a half circle on a piece of cardstock to use as a cutting template for all my pieces)
- 9 1/2" x 8 1/2" piece of fabric for hooks pocket
- 2" x 4" piece of fabric for button loop, or make a button hole on the curved top flap
- Two 5 1/2" x 7 1/2" pieces of fabric for zippered pocket
- 20 1/2" x 9 1/2" piece of interfacing (whichever weight you prefer, I used heavyweight as that was what I had on hand)
- 20 1/2" x 9 1/2" piece of batting
- 7" zipper
- button
First you will need to prepare the fabric that will make the pockets your crochet hooks will be slipping into later. Fold the pocket piece of fabric in half lengthwise, making it 9 1/2" x 4 1/4", then sew with a 1/4" seam allowance along the edge. After sewing snip off excess fabric, fold the tube right side out and press.
Next we'll work on the pocket in the lining. Yet again, I used the wonderful instructions from the
U-handbag blog by Lisa to install the zipper and pocket. If you like to sew you should definitely follow her blog, great stuff there! Anyway, I put my zipper opening centered at 5 1/2" from the bottom of the lining fabric and didn't use any interfacing for my pocket, other than that I pretty much followed her instructions exactly. I did need to trim both ends of my zipper before sewing on the second piece of pocket fabric to close it up.
 |
| l: before sewing; r:after zipper sewn in, before pocket lining sewn together |
Then you'll want to make a fabric sandwich by layering together the interfacing, batting and lining fabric. On top of this sandwich pin the crochet hook pocket fabric 2" above the zipper (
this is where the bottom of the hooks will be) and sew along the bottom edge of the pocket fabric. I like to position the pocket fabric so the top edge of the pocket fabric is the creased fold you pressed earlier, as I think it makes for a cleaner looking opening to the pockets this way. Then top stitch parallel to this seam 1/4" down from the pocket edge, this will make it easier to fold the case later.
 |
| placement of hook pocket above zipper |
Next, mark where the seams dividing the crochet hook pockets are going to be located with a cloth marking pen. I made these marks top and bottom to ensure straight lines would be sewn. Sew from the bottom to the top of the crochet hook pocket along these marks. Make sure to leave enough thread on all these seams to pull both ends through to the interfacing side to knot together and cut off the excess. I started in the middle at 5" in from the left edge and then sewed lines parallel to that one in 3/4" increments to make the hook pockets stopping at 1 1/2" from either edge.
 |
| sewing parallel lines for hook pockets |
 |
| measurements for hook pockets |
Next we'll do the top stitching for the upper fold at 8" from the bottom of the hook pocket and again at 1/4" above that (
if you need to make the case a little smaller for shorter hooks instead of cutting the fabric out smaller you can just do the top stitching at 6 1/2" from the bottom of the hook pocket and again 1/4" above that).
 |
| placement of top stitching for upper fold |
Now to make the button loop out of the 2"x4" fabric, fold it in half lengthwise (1"x4") and press, then fold the outer edges into the crease and press it flat again. Fold along the first crease and iron flat once more. Sew the open edge closed, with approximately 1/8" seam allowance. Pin the loop to the top center of the lining fabric sandwich, at the end where the curve is, with the raw fabric edges all lined up together and the loop to the inside of the lining.
 |
| l: button loop folded & pressed; r: pinned to top curve |
Layer the outer fabric on top of everything with right sides together, pin around the edges. Sew it all together 1/4" in from the edge leaving a 4" opening at the bottom to pull the case right side out. I sewed in a curve around the bottom corners to better match the deep curve on the top flap. Trim excess fabric all around, turn right side out, and press all seams. Hand stitch the opening at the bottom of the case closed. For added stability I sewed a top stitch all around the outside edge of the case 3/8" in from the edge. Pull all loose threads through to the lining side, tie off and snip excess.
 |
| all pinned and ready to sew shut |
 |
| hole that needs hand stitching to close |
If you chose the button loop option fold the case into thirds to position the button so the loop will go around it and hand sew the button on through only the outer fabric. If you decided to do a buttonhole put it where you like on the upper curved flap and then hand sew on your button to the bottom flap for either option. Ta-da! All done. Now go crochet something!
 |
| finished cases, yea! |
Please let me know if you were able to understand my instructions, or if you have had any problems with them. I sometimes over think things so may have not made something as clear as I could have. Happy sewing!